How to access SharePoint data from Azure Function with SPFx and PnP Core SDK

This post challenge:
We have an SPFx solution, which performs HTTP calls to our API (protected with Azure AD authentication), hosted on Azure Functions. From Azure Function we further call SharePoint endpoints to get some data. We use PnP Core SDK to interact with SharePoint. For simplicity, the API endpoint returns all list titles in a web, where we’re runnning our SPFx web part.
Why PnP Core SDK? Because it’s the future of PnP Sites Core library. PnP Core SDK uses a modern .NET development stack and built from the ground up to better support different types of apps, to be cross-platform, fully tested, and maintainable. Read more on the documentation here. Also, Beta1 of the PnP Core SDK was released recently, so it’s a good chance to explore it!
Important! I use the Beta version of the PnP Core SDK in this post. Most likely in GA version API will be the same or with just slight differences.
The post contains two parts - one describing local setup - steps needed to configure everything for development locally, the second part is the production deployment guide.
The source code for this post is available on GitHub here.
Table of Contents
Local setup
1. Create a new App Registration in the Azure portal
Go to your Azure portal and add a new app registration. Give it a name (SPFx PnP-Core API in my case):
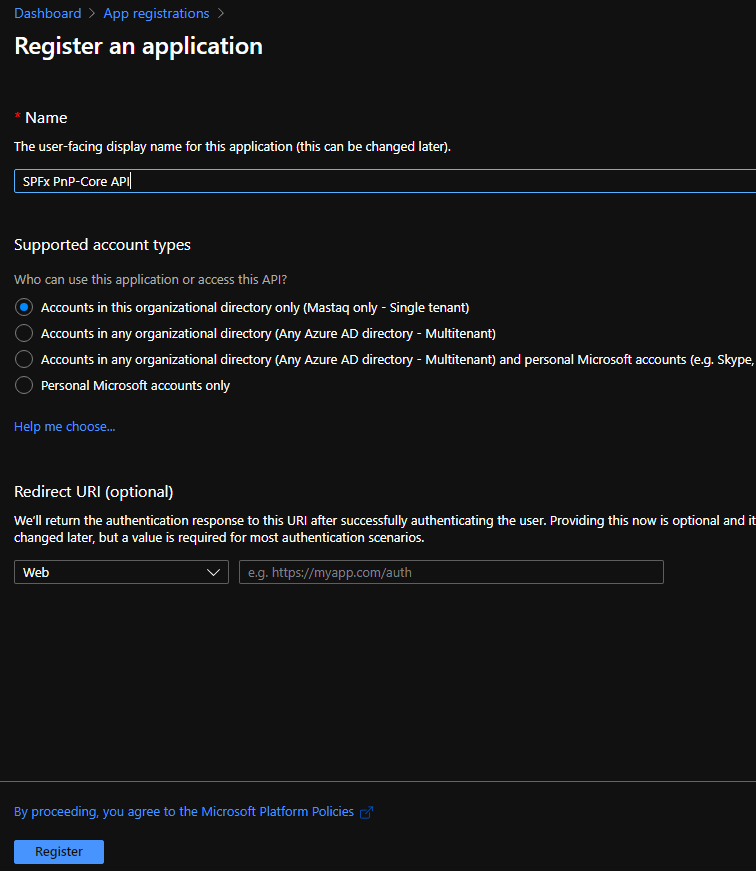
Under Certificates & secrets generate a new Client Secret and save value somewhere (we’ll need it later). Under the Overview tab save Application (Client) Id and Directory (Tenant) Id values.
Add below permissions:
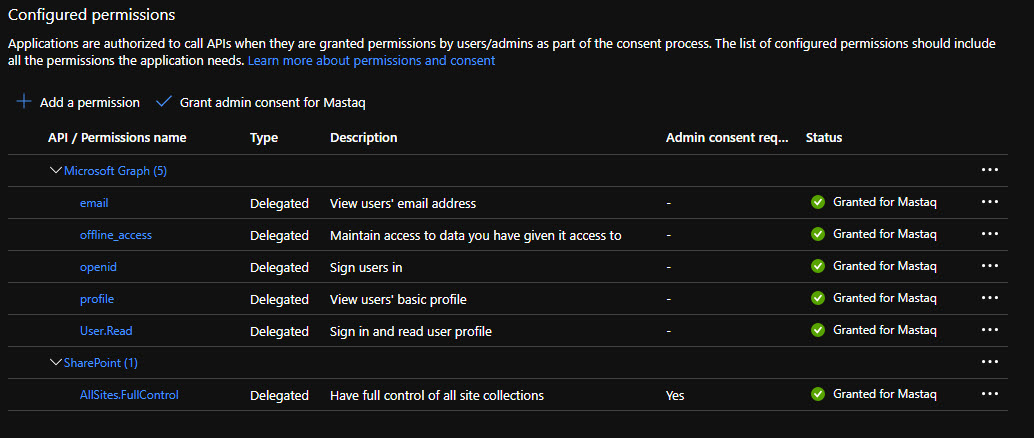
Click on “Grant admin consent for …” in order to trust all added permissions.
We’ve configured an app, which we will for authentication and OAuth token generation in our app.
2. Create SPFx solution
Scaffold a new React-based SPFx web part. Our web part will simply output all list titles using an unordered list HTML component. This is the code inside web part:
export const CallPnPCoreApi: FC<ICallPnPCoreApiProps> = (props) => {
  const [lists, setLists] = React.useState<any[]>();

  React.useEffect(() => {
    const getData = async () => {
      const client = await props.context.aadHttpClientFactory.getClient('<client id>');
      const siteUrl = props.context.pageContext.site.absoluteUrl;
      const tenantId = props.context.pageContext.aadInfo.tenantId;
      const results: any[] = await (await client.get(`<az func url>/api/GetLists/?siteUrl=${siteUrl}&tenantId=${tenantId}`, AadHttpClient.configurations.v1)).json();

      setLists(results);
    };

    getData();
  }, []);

  if (!lists) {
    return (
      <div>Loading....</div>
    );
  }

  return (
    <div className={styles.callPnPCoreApi}>
      <div>Site lists:</div>
      <ul>
        {lists.map(l => (
          <li>{l.title}</li>
        ))}
      </ul>
    </div>
  );
};NOTE. You might find some antipatterns here - use of any, passing full context via props. However it’s ok for demo purposes, but don’t do it in production code.
In the code above, you should replace
What the component does? It uses AadHttpClient in order to send an authenticated request to our Azure Function. We pass tenantId and current site url as parameters via the query string. Also, SPFx under the hood silently generates OAuth bearer access token for us and sends it in the Authorization HTTP header.
3. Update SPFx package-solution.json
Now we need to add our API to the list of Web API permissions inside config/package-solution.json. Open it and add the below section:
"webApiPermissionRequests": [
      {
        "resource": "SPFx PnP-Core API",
        "scope": "user_impersonation"
      },
      {
        "resource": "Windows Azure Active Directory",
        "scope": "User.Read"
      }
    ]
Where SPFx PnP-Core API is your App Registration name. What does scope user_impersonation mean? It means, that we request OAuth access token just for authentication against our service.
4. Deploy SPFx solution and approve permission request
Run
gulp bundle --ship
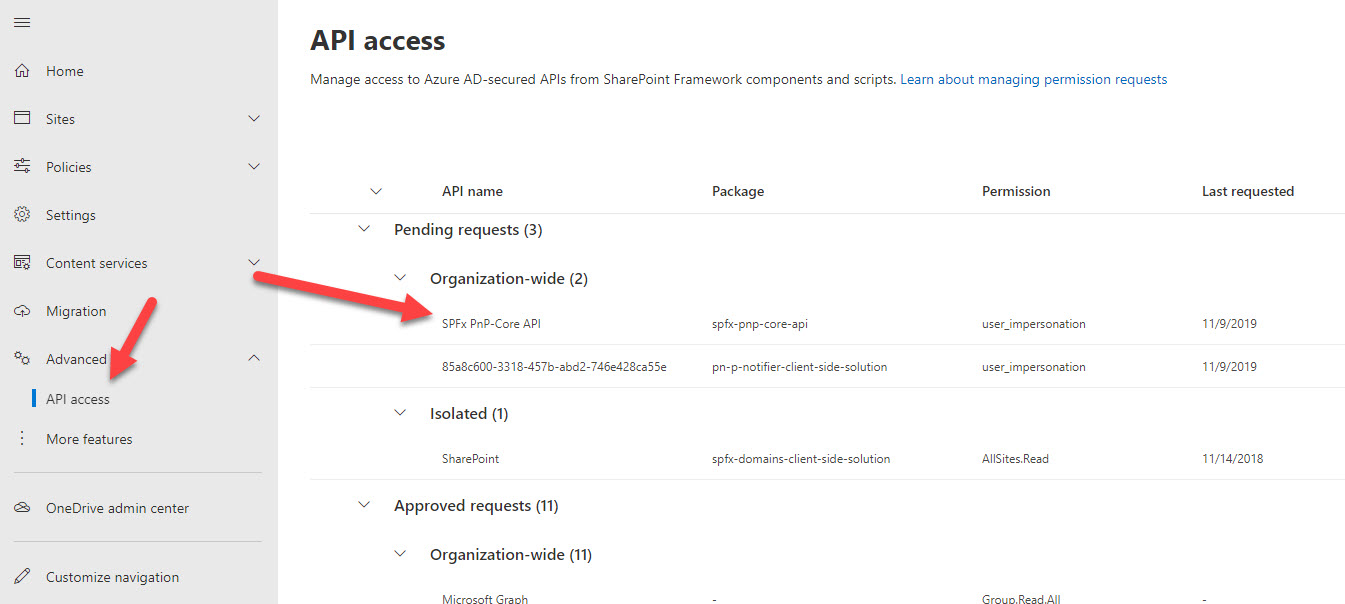
gulp package-solution --shipUpload the resulting package to your SharePoint App Catalog.
Now navigate to your SharePoint admin center, API access page and approve all requested permissions:
5. Create Azure Function
Important! For Azure Functions, I use netcoreapp3.1 as the target framework because net5 is not yet fully supported. However, the API for .NET 5 will be the same.
Create a new function using the Visual Studio template. Add NuGet packages PnP.Core.Auth and PnP.Core.
Update your local.settings.json file with additional values for Client id and Secret. Also, add CORS support:
{
  "IsEncrypted": false,
  "Values": {
    "AzureWebJobsStorage": "UseDevelopmentStorage=true",
    "FUNCTIONS_WORKER_RUNTIME": "dotnet",
    "ClientSecret": "<your client secret>",
    "ClientId": "<your client id>"
  },
  "Host": {
    "CORS": "*"
  }
}
For our azure function, we need dependency injection configuration, in order to inject our configuration values (Client id and secret) and PnP Core related objects. Thus add Startup class to your function:
public class Startup : FunctionsStartup
    {
        public override void Configure(IFunctionsHostBuilder builder)
        {
            var config = builder.GetContext().Configuration;
            var appInfo = new AppInfo();
            config.Bind(appInfo);

            builder.Services.AddSingleton(appInfo);
            builder.Services.AddPnPCore();
        }
    }
Where AppIinfo is just a container class:
public class AppInfo
    {
        public string ClientId { get; set; }
        public string ClientSecret { get; set; }
    }
AddSingleton registers the instance of AppInfo so that it becomes available in our function’s constructor via DI. AddPnPCore also registers some PnP Core classes for DI. Additionally, you can use overload with the PnP Core options object and preconfigure some settings for PnP Core.
The most interesting part is our actual code inside Azure Function:
public class DefaultFunctions
    {
        private AppInfo _appInfo;
        private readonly IPnPContextFactory _pnpContextFactory;

        public DefaultFunctions(AppInfo appInfo, IPnPContextFactory pnpContextFactory)
        {
            _appInfo = appInfo;
            _pnpContextFactory = pnpContextFactory;
        }

        [FunctionName("GetLists")]
        public async Task<IActionResult> Run(
            [HttpTrigger(AuthorizationLevel.Anonymous, "get", Route = "GetLists")] HttpRequestMessage request, ILogger log)
        {
            var query = request.RequestUri.ParseQueryString();
            var siteUrl = query["siteUrl"];
            var tenantId = query["tenantId"];
            var clientSecret = new SecureString();

            foreach (char c in _appInfo.ClientSecret) clientSecret.AppendChar(c);

            var onBehalfAuthProvider = new OnBehalfOfAuthenticationProvider(_appInfo.ClientId, tenantId, clientSecret, () => request.Headers.Authorization.Parameter);
            var results = new List<ListData>();

            using (var pnpContext = await _pnpContextFactory.CreateAsync(new System.Uri(siteUrl), onBehalfAuthProvider))
            {
                var lists = pnpContext.Web.Lists.Load(l => l.Id, l => l.Title).ToList();

                foreach (var list in lists)
                {
                    results.Add(new ListData { Title = list.Title });
                }
            }

            return new JsonResult(results);
        }
    }
First of all, take a note at the constructor - we use DI to inject AppInfo object and IPnPContextFactory.
At the function body, we extract necessary parameters - tenantId, siteUrl from query, and constract the instance of PnPContext.
In order to access SharePoint data, a request needs to be authenticated. PnP.Core.Auth contains classes to perform different way of authentication depending on your needs. Which one to use? In our case, the answer is very straightforward. We can use on-behalf-of flow to get access token.
How it works? Our azure function uses Azure AD authentication, so we have OAuth token for our function available in the HTTP header. Our app registration also lists additional permissions to other services (or better to say APIs) - SharePoint. On-behalf-of flow allows us to exchange our API’s access token for another token API, listed in the app registration.
Fortunately, we don’t’ have to do all the things in code manually. PnP Core Auth with help of MSAL.NET does everything for us internally. We just configure all necessary parameters on this line:
var onBehalfAuthProvider = new OnBehalfOfAuthenticationProvider(_appInfo.ClientId, tenantId, clientSecret, () => request.Headers.Authorization.Parameter);Where request.Headers.Authorization.Parameter contains our OAuth bearer token. Now, as we have a way for authentication, we can easily instantiate PnPContext with the site url parameter.
6. Run it!
Hit F5 to run Azure Function.
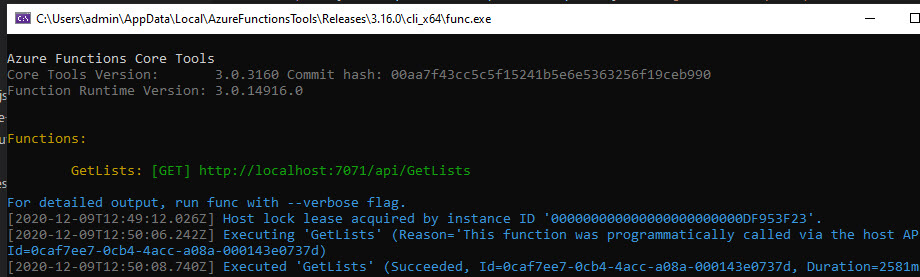
Copy function url and update your webpart.
Run gulp serve in SPFx solution. Open hosted workbench, add your webpart, and see it in action:
Deploy to production
1. Create new Azure Function inside Azure Portal
Go to the Azure Portal and create a new Function App (consumption plan).
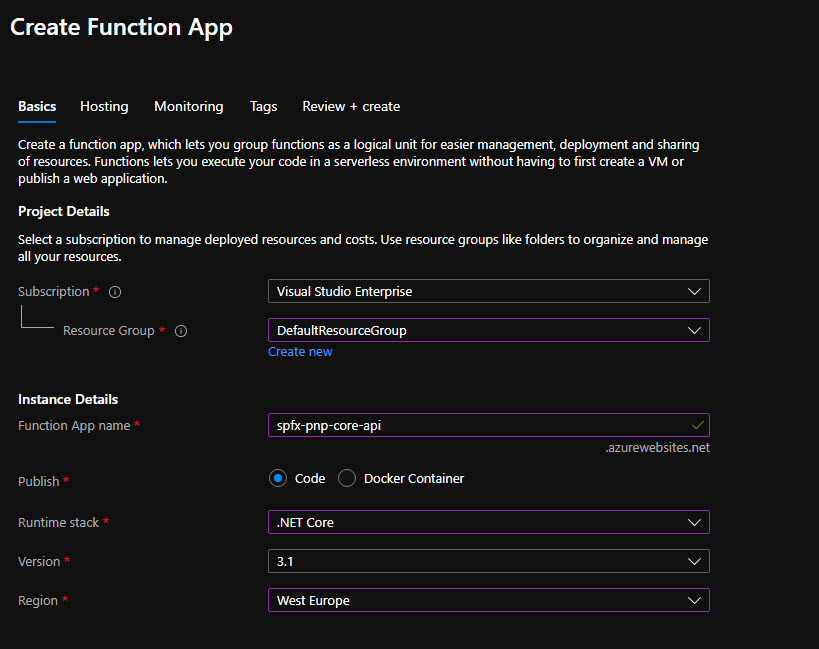
Under CORS setting set either your SharePoint host url domain or just * if you want to open this API for other hosts.
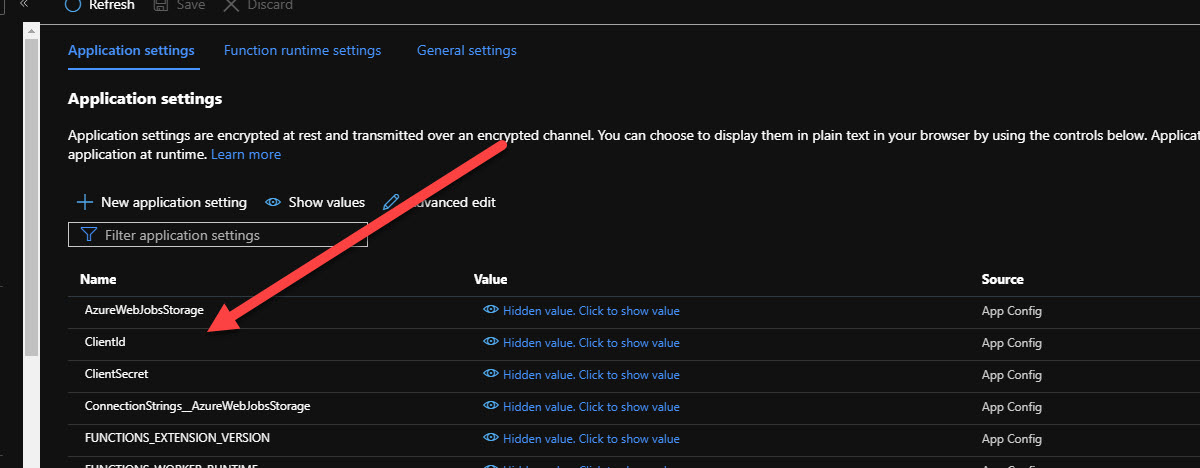
Under Configuration add new Application settings - ClientSecret and ClientId.
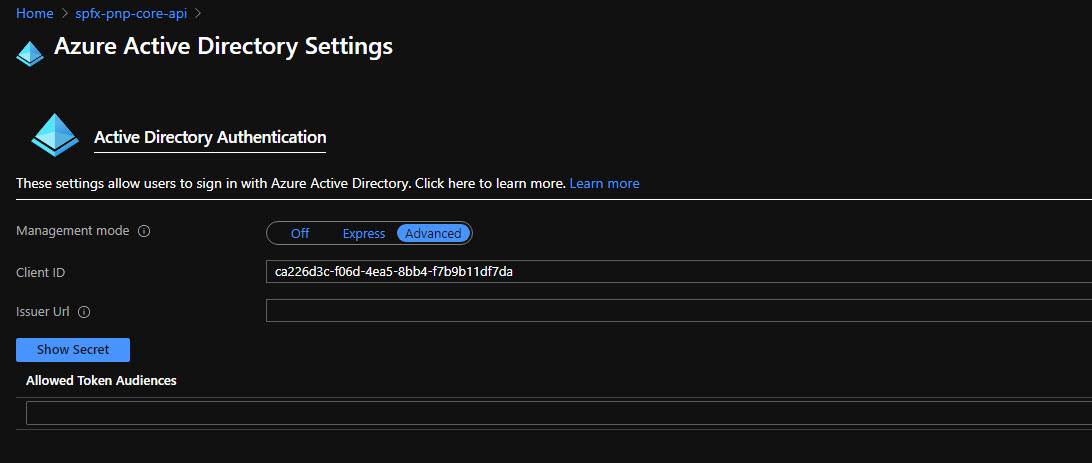
Then open the Authentication / Authorization tab and enable App Service Authentication:
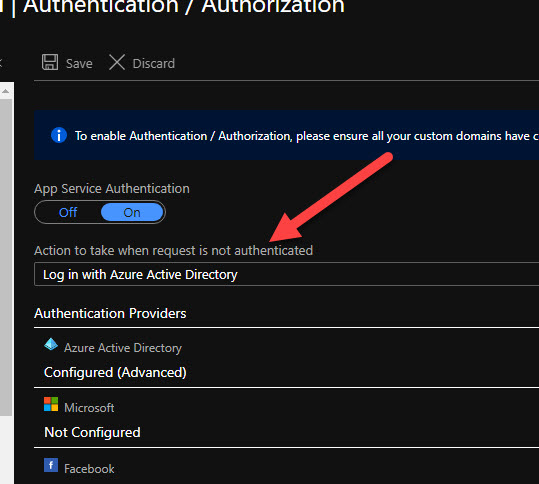
Click Azure Active Directory and select Advanced configuration. Paste your ClientId. You can leave Allowed Token Audiences empty because by default it implicitly checks your ClientId as a valid audience, so it will just work. Save the configuration:
2. Deploy your Azure Function from Visual Studio to a newly created function inside the portal
This step is quite straightforward.
3. Package and deploy SPFx solution
Inside your web part change the url to point to your production version of functions (better to have a dynamic environment variable for such task).
Again run
gulp bundle --ship
gulp package-solution --ship
and upload your package to the App catalog.
Add webpart to a page and you’re good to go!
Hope this tutorial was helpful. Please ask your questions in the comments.