Introducing SharePoint Typed Item - Visual Studio Code extension
![]()
When working with SharePoint as a developer you often need access to SharePoint data. If you use TypeScript you expect that all data will be strongly typed. However, it’s not a case if you work with SharePoint dynamic data like lists and libraries.
Consider the code below written with PnPjs:
sp.web.lists.getByTitle('Clients').items.get()
      .then((items: any[]) => {
        for (const item of items) {
          console.log(item);
        }
      });
or with SPHttpClient inside SharePoint Framework solution:
this.context.spHttpClient.get(`${currentWebUrl}/_api/web/lists/getByTitle('Clients')/items`, SPHttpClient.configurations.v1)
      .then((response: SPHttpClientResponse) => {
        response.json().then((items: any[]) => {
          for (const item of items) {
            console.log(item);
          }
        });
      });
In both cases, you don’t know the type of items beforehand and have to use any type (items: any[]). What’s wrong with any type? In TypeScript it’s considered as bad practice. Of course you can and should use any in some edge cases, but in general, it’s considered as bad. With any type you don’t have type intellisense in vscode, you lose type checking if you want to use your variable elsewhere. So how to fix it?
To fix it you should create a separate interface manually and describe all needed fields. In that case instead of any you use:
items: Client[]While it works, it has a few drawbacks:
- you have to create all needed interfaces manually
- if you have a need to access additional fields, you will have to go and update corresponding interfaces
- if you (or team members) add a field to a list, you will have to go and update corresponding interfaces
What if there is a tool, which generates all required always up-to-date interfaces for you?
This is exactly what SharePoint Typed Item does - it takes your configuration and outputs TypeScript interfaces based on SharePoint lists, libraries and content types.
Read further to find out how to get started with SharePoint Typed Item extension.
Installation
In VS Code go to extensions and search for “SharePoint Typed”, locate “SharePoint Typed Item” and install it. Link to VS Code Marketplace.
Configuration
Before using the extension you should configure it. You can provide configuration inside the VS Code’s settings.json file or in a separate file. The extension adds intellisense for VS Code settings for any file “sp-typed-item*.json” in your workspace.
If you go with settings.json:
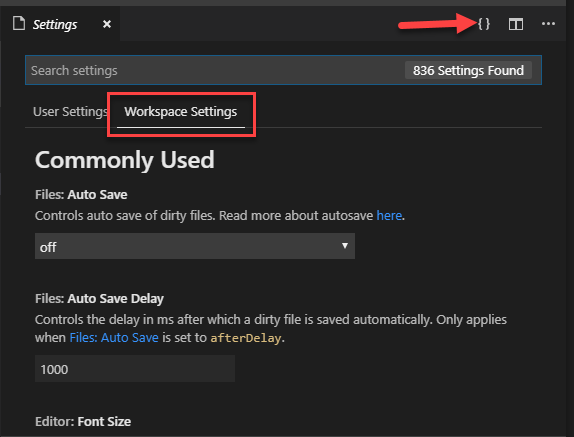
Make sure that you have the settings.json file in your workspace under .vscode folder. If not, go to File menu -> Preferences -> Settings. Select “Workspace Settings” in the top menu and switch to JSON edit mode using curly braces button in the top right corner. The file .vscode/settings.json will be created for you.
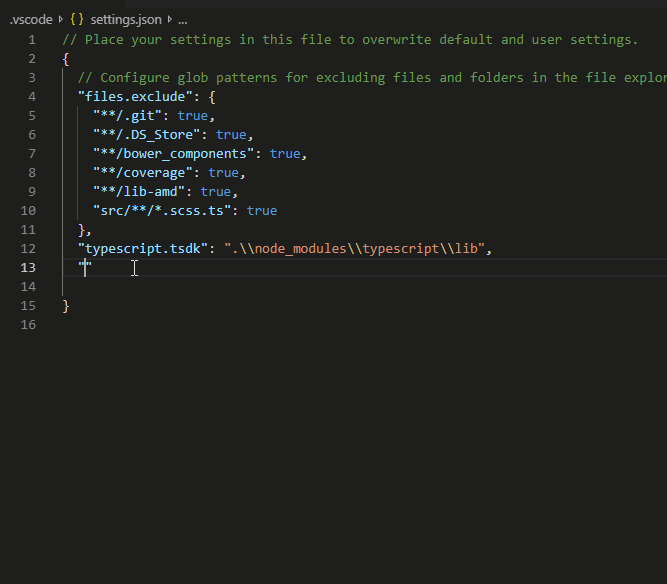
Add a new entry with key sp-typed-item.config and start configuring the extension. Notice how intellisense works as you type:
Explore all possible configuration options at SharePoint Typed Item extension home page, because in future I might add new options.
If you go with a separate sp-typed-item.json configuration file
Create a file with name sp-typed-item.config.json and add configuration data inside it. Any file sp-typed-item*.json also receives intellisense:
Open your .vscode/settings.json update “sp-typed-item.configPath” setting to point to your custom sp-typed-item.config.json:
"sp-typed-item.configPath": "sp-typed-item.config.json"Minimal configuration
Below is a minimal configuration you should provide to make it work:
[
  {
    "siteUrl":"https://contoso.sharepoint.com/sites/dev",
    "outputPath":"./Generated",
    "lists":[
      {
        "url":"Lists/Clients"
      }
    ]
  }
]
Now you have the extension configured and ready to start using it!
Use it
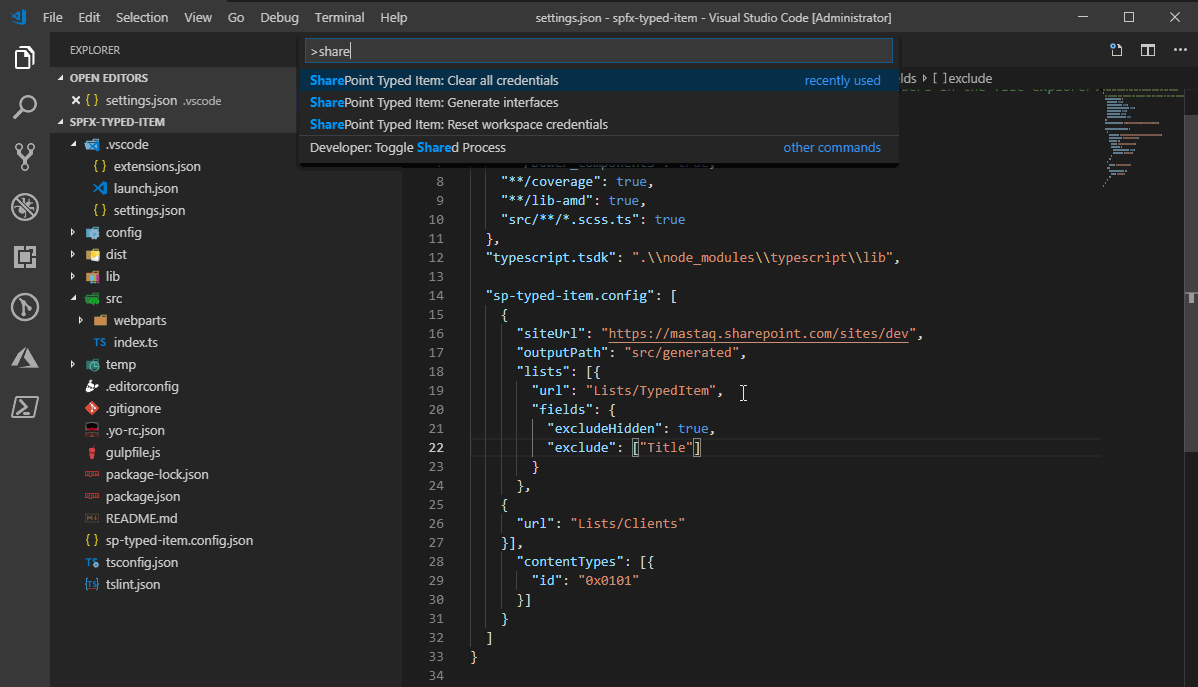
Open VS Code command palette (F1) and type “SharePoint” and select “SharePoint Typed Item: Generate interfaces”. When running for the first time the extension will ask for authentication details. Go through the process and finally your interfaces will be generated:
The extension stores authenticated data in user’s app data folder (or HOME for Mac and Linus). All sensitive information (secrets and passwords) are encrypted and not stored in clear text. The encryption algorithm relies on your machine unique key.
Additional authentication features
If you are familiar with great tool node-sp-auth-config by Andrew Koltyakov, you have an option to provide authentication file generated with the tool. You should also use this tool for some advanced authentication scenarios like Form-based authentication or TMG.
How to use it
1. Install it globally:
$ npm install node-sp-auth-config -g2. Initialize config:
$ sp-auth init --path private.auth.jsonNow as you have your authentication configuration file you should add “authConfigPath” to sp-typed-item.config.json and point it to your private.auth.json:
"authConfigPath": "./private.auth.json",Please enjoy it!