How to extend deployment of sharepoint solution in Visual Studio using "Run PowerShell script" deployment step.
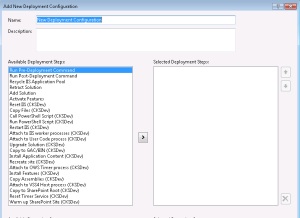
Hi2all! Today I’m going to explain how you can easily extend your deployment tasks using Visual Studio and plugin CKSDEV for Visual Studio 2010. This plugin enhance VS with many custom SharePoint project items (SPI), add additional deployment configuration for your project and some other useful details. One of the most great possibilities that CKSDEV offer are additional deployment steps:
Imagine that after deployment you must create on the site several sharepoint groups and assign permission to them. Using deployment step “Run PowerShell Script” you can place all logic reside to group creation to your custom powershell script file and execute this script file after deployment. We start with creation of script file and then we integrate script in Visual Studio 2010. I’ve been created xml file definition for groups that have such structure:
DOMAIN\FirstName_SecondNameNow lets create two files - in the first we are storing all functions and the second will use functions from this file. Call the first file “functions.ps1” and the second - “starter.ps1”. “functions.ps1” include function “AddGroups” that actually read xml with group definition and adds required groups to a site. I will explain in other post how my code work, but it rather simple, if you have base knowledges of powershell you easily understand it:
function AddGroups([string]$siteUrl, [string]$pathToDefinitionFile)
{
	$site = Get-SPSite $siteUrl
	$web = $site.RootWeb

	$groupsXML = [xml] (Get-Content ($pathToDefinitionFile))

	$groupsXML.Groups.Group | ForEach-Object {
		if ($web.SiteGroups[$_.name] -eq $null)
		{
			$newGroup = $web.SiteGroups.Add($_.name, $web.Site.Owner, $web.Site.Owner, $_.description)
			$group = $web.SiteGroups[$_.name]
			ApplyPermission $web $group $false $web.RoleDefinitions[$_.permission]
			if($_.Users -ne $null)
			{
				$_.Users.User | ForEach-Object {
					$group.AddUser($_.get_InnerText(), $_.mail, $_.name, $_.notes)
				}
			}
		}
}
$web.Dispose()
$site.Dispose()
}
function ApplyPermission([Microsoft.SharePoint.ISecurableObject]$securable, [Microsoft.SharePoint.SPPrincipal]$principal, [bool]$copyRoleAssignments, [Microsoft.SharePoint.SPRoleDefinition]$roleDefinition)
{
	$newRoleAssignment = New-Object Microsoft.SharePoint.SPRoleAssignment($principal)
	$newRoleAssignment.RoleDefinitionBindings.Add($roleDefinition)
	if (!$securable.HasUniqueRoleAssignments)
	{
		$securable.BreakRoleInheritance($copyRoleAssignments);
	}
	$securable.RoleAssignments.Add($newRoleAssignment);
}
Second file contains following code:
param([string]$path)
Add-PSSnapin Microsoft.SharePoint.PowerShell -EA SilentlyContinue
. ($path + "\functions.ps1")
$siteUrl = "http://localhost/sites/test"

#Add groups
AddGroups $siteUrl ($path + "\Resources\Groups.xml")
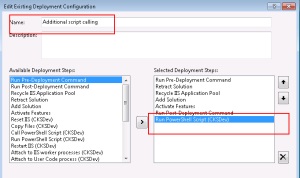
Now lets go to the Visual Studio, and create custom deployment configuration. I simply copy steps from default configuration and then add step “Run PowerShell Script”:
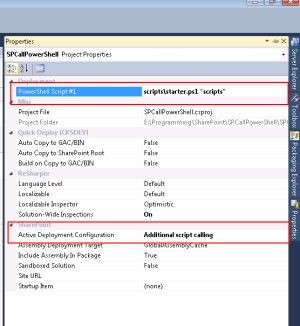
Whenever you add new step “Run PowerShell Script” Visual Studio automatically adds new textbox in project properties where you can specify path to your script file. This path is relative to project dir (not to solution dir). You can mentioned that there is also a step “Call PowerShell Script” that do not creates additional settings, I still do not understand how to work with this step. This my project settings:
Next right-click on project and select deploy. After deploy your custom script will execute and add new group to site. In next chapter I will more deeper explain how this code works. You can download solution with script files here (16.20 kb).
Have fun with powershell scripts!


