Why can’t we use regular http web api instead of WCF web service for our SharePoint RERs? Actually we can! SharePoint makes HTTP POST to any http endpoint, the only task for us is to parse body correctly and send a response back.
In this tutorial I’m going to show how to set up Azure Function, which acts as http endpoint for SharePoint Remote Event Receiver, everything running on Node.js and written in TypeScript! We’ll also use pnp-js-core to interact with SharePoint REST API from event receiver. The source code available at github repo. Let’s get started.
1. First things first, let’s create our Azure Function stub, run and test it locally. I’m going to use azure-functions-cli for that purpose. You need to install it globally:
npm i -g azure-functions-core-tools
Create a folder and run
func init --no-source-control
then
func new
and select TypeScript language, HttpTrigger and give it any name (or use default one).
2. Function is ready, but unfortunately azure function execution environment doesn’t support TypeScript well yet. Thus we have to add TypeScript compilation part. In a root folder for your Azure Function project run
npm init
and setup project. Install typescript:
npm install typescript --save-dev
In the same directory create tsconfig.json and put below content:
{
    "compilerOptions": {
      "module": "commonjs",
      "target": "es6",
      "noImplicitAny": true,
      "strictNullChecks": true,
      "sourceMap": true
    },
    "exclude": [
      "node_modules"
    ],
    "include": [
      "HttpTriggerTS"
    ]
}
Change the name “HttpTriggerTS” to a folder name with your function. Open package.json (npm project config file) and put below code for the scripts section:
{
    "build:watch": "tsc -w",
    "build": "tsc",
    "az": "npm run build && func host start"
}
Now run
npm run az
and you are good to go. Your local Azure Function host is running, you can test that functions are OK in Postman by sending POST request with name query param:
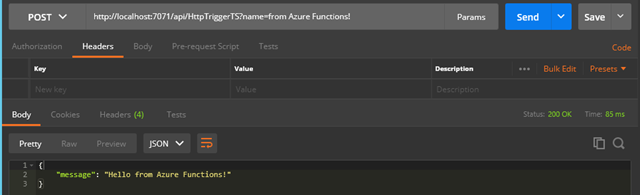
You can also run npm run build:watch in a separate console window in order to automatically build and re-run you host when you change source .ts files.
3. We are going to work with SharePoint Online, so in order to make debugging and development easier, I’m using ngrok service in order to proxy all requests to my locally running instance of Azure Function.
Install ngrok globally:
npm install ngrok -g
and setup proxy to your local azure functions host:
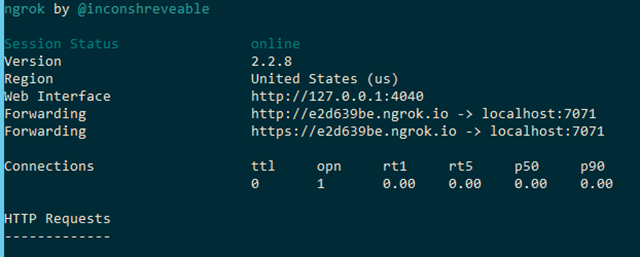
ngrok http 7071 --host-header=localhost
You should receive below info in console:
Test your function in Postman with ngrok’s url:
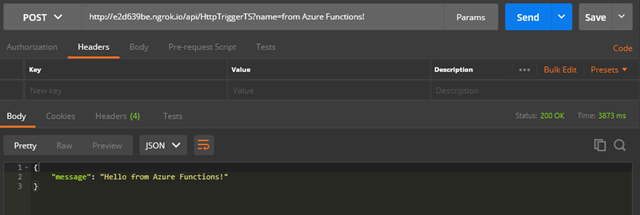
Do not close ngrok process and let it run through this tutorial.
Hint:
Keep ngrok running, open your project in VSCode, put a breakpoint in HttpTriggerTS/index.ts, hit F5, send request in Postman once again and see the magic – your break is fired and you have cool debugging experience!
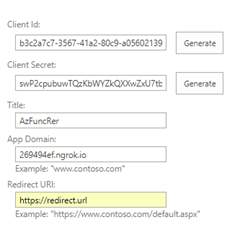
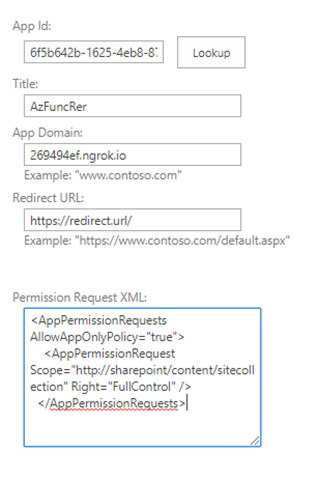
4. So far so good. Let’s got to SharePoint part. We need an app we are going to test. Let’s go and create one in SharePoint using _layouts/15/AppRegNew.aspx page. Click generate for ClientId and ClientSecret, put any meaningful title, for app domain (and this is important for our debugging) put your ngrok domain, i.e. e2d639be.ngrok.io and any redirect url:
Add permissions to a newly created app. Open _layouts/15/AppInv.aspx and add required permissions to the app. I’m adding full control for site collection:
<AppPermissionRequests AllowAppOnlyPolicy="true">
    <AppPermissionRequest Scope="http://sharepoint/content/sitecollection" Right="FullControl" />
</AppPermissionRequests>
Click Create and trust the app.
5. Ok, we’ve added the app. Now lets add remote event receiver to test list. I’m going to use .net console application for that purpose (with PnP-Site-Core AuthManager):
var mngr = new AuthenticationManager();
var clientId = "your client id";
var clientSecret = "your client secret";

var clientContext = mngr.GetAppOnlyAuthenticatedContext("your sharepoint site url", clientId, clientSecret);

var list = clientContext.Web.GetListByUrl("Lists/Test list");
clientContext.ExecuteQuery();

AddEventReceiver(list, "https://e2d639be.ngrok.io/api/HttpTriggerTS");

...
private static void AddEventReceiver(List list, string url)
{
	var eventReceiver =
		new EventReceiverDefinitionCreationInformation
		{
			EventType = EventReceiverType.ItemAdded,
			ReceiverName = "azfunc-added",
			ReceiverUrl = url,
			SequenceNumber = 1000
		};

	list.EventReceivers.Add(eventReceiver);

	list.Context.ExecuteQuery();
}
Run it and check if event receiver has been added. You can use cool SharePoint Insider Chrome add-on for that purpose. It’s very important to add remote event receiver using clientId and clientSecret credentials of your app. Failing that you will never receive context token in your RER.
6. The most interesting and difficult part is Azure Function code. What we need to do is:
a. Parse incoming request’s body
b. Extract and validate SharePoint context token
c. Create access token from context token
d. Perform an action with pnp-js-core and access token
e. In case of sync (-ing) event, we need to find a way to respond with appropriate response and even cancel the event if required.
a. Parse incoming request’s body.
I use xml2js module for that purpose. In this case parsing looks easy:
let data = await xml2Json(req.body);
...
async function xml2Json(input: string): Promise {
    return new Promise((resolve, reject) => {
        let parser = new Parser({
            explicitArray: false
        });

        parser.parseString(input, (jsError: any, jsResult: any) => {
            if (jsError) {
                reject(jsError);
            } else {
                resolve(jsResult);
            }
        });
    });
}
b. Extract and validate SharePoint context token. Context token stored inside event properties:
let eventProperties = data["s:Envelope"]["s:Body"].ProcessOneWayEvent.properties;
let contextToken = eventProperties.ContextToken;
For token validation I’m using my own module node-sp-auth which contains TokenHelper class (similar to .net one). TokenHelper validates tokens as well as produces access tokens.
import { TokenHelper, IOnlineAddinCredentials, IAuthData } from "node-sp-auth";
...
let creds: IOnlineAddinCredentials = {
        clientId: getAppSetting('ClientId'),
        clientSecret: getAppSetting('ClientSecret')
    };

let appToken = TokenHelper.verifyAppToken(contextToken, creds);
This verification is extremely important. First of all you will not able to create an access token later, also it acts as additional security mechanism. It verifies that token has valid signature, thus issued by your SharePoint site and not by any smart hacker.
c. Create access token from context token. This task is pretty easy with help of TokenHelper:
let itemProperties = eventProperties.ItemEventProperties;
let authData: IAuthData = {
        refreshToken: appToken.refreshtoken,
        realm: appToken.realm,
        securityTokenServiceUri: appToken.context.SecurityTokenServiceUri
    };
let creds: IOnlineAddinCredentials = {
	clientId: getAppSetting('ClientId'),
	clientSecret: getAppSetting('ClientSecret')
};
let acessToken = await TokenHelper.getUserAccessToken(itemProperties.WebUrl, authData, creds);
d. Perform an action with pnp-js-core and access token. Now we are attaching Bearer header to pnp-js-core headers and perform an action (update item title):
let sp = pnp.sp.configure({
	headers: {
		"Authorization": `Bearer ${acessToken.value}`
	}
}, itemProperties.WebUrl);

let itemUpdate = await sp.web.lists.getById(itemProperties.ListId).items.getById(itemProperties.ListItemId)
	.update({
		Title: "Updated by Azure function!"
	});

console.log(itemUpdate);

context.res = {
	status: 200,
	body: ''
} as any;

context.done();
Besides you also need to add extra code to make pnp-js-core work in node.js:
import * as nodeFetch from 'node-fetch';
import fetch from 'node-fetch';
....
configurePnP();
...
function configurePnP(): void {
    global.Headers = nodeFetch.Headers;
    global.Request = nodeFetch.Request;
    global.Response = nodeFetch.Response;

    pnp.setup({
        fetchClientFactory: () => {
            return {
                fetch: (url: string, options: any): Promise => {
                    return fetch(url, options);
                }
            }
        }
    })
}
e. In case of sync (-ing) event, we need to find a way to respond with appropriate response and even cancel the event if required.
In that case we need to return special response. It can be stored in a separate file, response.data:
<s:Envelope
    xmlns:s="http://schemas.xmlsoap.org/soap/envelope/">
	<s:Body>
		<ProcessEventResponse
            xmlns="http://schemas.microsoft.com/sharepoint/remoteapp/">
			<ProcessEventResult
                xmlns:i="http://www.w3.org/2001/XMLSchema-instance">
				<ChangedItemProperties
                    xmlns:a="http://schemas.microsoft.com/2003/10/Serialization/Arrays"/>
				<ErrorMessage>Wow that's not good!</ErrorMessage>
				<RedirectUrl i:nil="true"/>
				<Status>CancelWithError</Status>
			</ProcessEventResult>
		</ProcessEventResponse>
	</s:Body>
</s:Envelope>
In Status field you can put any value from SPRemoteEventServiceStatus enum.
The code:
async function processEvent(eventProperties: any, context: any): Promise {
    // for demo: cancel sync -ing RER with error:

    let body = fs.readFileSync('AzFuncRer/response.data').toString();
    context.res = {
        status: 200,
        headers: {
            "Content-Type": "text/xml"
        },
        body: body,
        isRaw: true
    } as any;

    context.done();
}
Basically this is it. Of course, for real life scenario you will use your real Azure Function urls without ngrok. ngrok just helps you to have better local development and debugging experience. You can find the full source code at the corresponding github repo.
Here is a small demonstration on how does it work all together in action:
