
SharePoint modern pages support approvals with preconfigured Microsoft Flow. What if we want to partially automate and improve this process with some smart services, which will automatically reject approval if a page contains not appropriate content. Or add a piece of information to an approver to pay special attention to a particular page? This is a nice place for Azure cognitive services to come into the play!
For your convenience, the whole flow in png format is available by this link.
Azure Content Moderator
Azure provides a lot of different cognitive services and one of them is Content Moderator:
The Azure Content Moderator API is a cognitive service that checks text, image, and video content for material that is potentially offensive, risky, or otherwise undesirable.
Sounds interesting! To be more precise, currently Content Moderator has below core features:
- Detects profanity in over 100 languages. It includes profane words based on a built-in list. You have an option to provide your own inclusion or exclusion lists with your specific terms.
- Text classification. It detects a potential presence of language that may be considered sexually explicit or adult or offensive in certain situations. Text receives classification from 0 to 1. The higher the score, the higher the model is predicting that the category may be applicable (text is offensive or adult etc.)
- Detects Personally Identifiable Information (PII) - any presence of emails, SSN, emails, phones, addresses in text. This is sensitive information and sometimes it's not desirable to have it available publicly.
- Image and video moderation detects adult or racy content, face detection, and some other features
That's just basics. The content moderator is able to do a lot more cool things. To give you a whole picture check out content moderator platform overview:
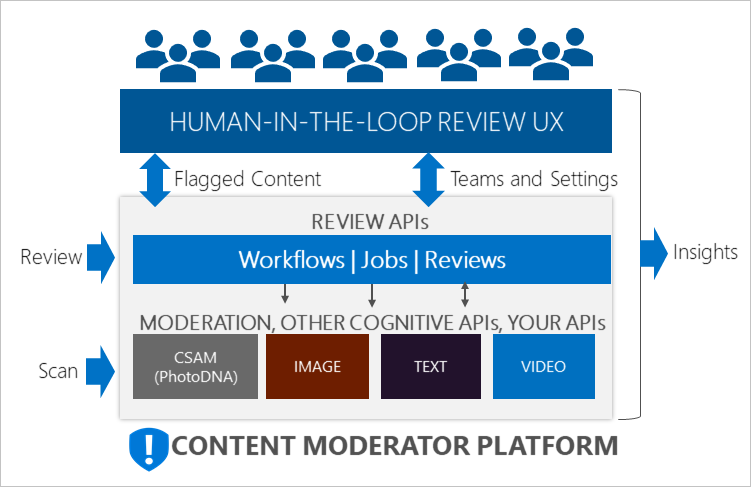
What is important for us, that it performs some smart analysis on text (images and video) and suggests that content is probably unwanted. We can utilize it in order to perform pre-moderation for our content.
Now about the sad part. Currently, Content Moderator supports only a maximum of 1k of text for moderation. Which makes it a bit useless for real life news moderation, because 1000 bytes of text is too small. I expect that in future this limit will be increased because Content Moderator supports HTML, XML and markdown validation. Can you imagine how small is 1k of HTML? Official docs advertizes it as for "Enterprise media companies that implement centralized moderation for their content". I can't imagine how Enterprise media companies pass the limit of 1k of text.
Read more here about Azure Content Moderator.
News post approvals with the help of Content Moderator: the goal
Now as we know what is possible with Content Moderator, let's add it to our approval flow. There are a lot of different interesting scenarios possible. For my approval flow I would like to perform the below steps:
- For every piece of news posted, the flow uses Content Moderator and detects profane language, classifies text and detects Personally Identifiable Information (PII). I use custom terms along with the default list to find a profane language.
- Do not start approval If a news post contains profane words, set moderation status to Rejected and send a notification to the news poster.
- Do not start approval If a news post classified with a high score (let's say more than 0.9), set moderation status to Rejected and send a notification to the news poster.
- If the news is OK (no profane words, classification is OK), but contains PII (for example Security Social Number, SSN), start the approval process and include a message to an approver, saying that the news most likely contains PII. In that case, an approver will pay special attention to the news post.
- Finally, an approver approves or rejects news.
Let's build the Flow!
Create Azure Content Moderator service
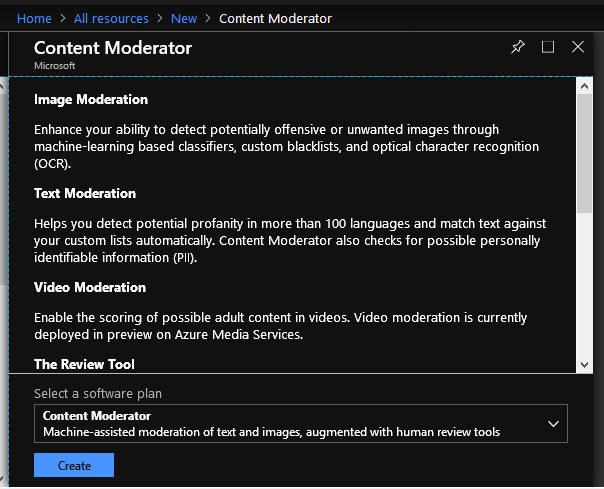
Go to your Azure portal, click All Resources, then Add and search for Content Moderator. Click on Create to create a new instance in your Azure subscription:
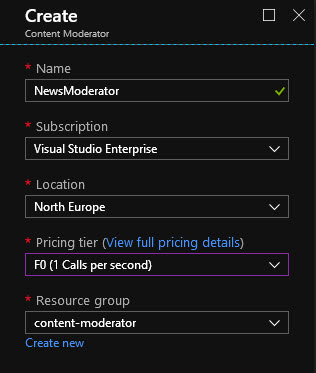
Give it a name, select subscription, pricing tier, and resource group:
Currently, it supports 2 pricing levels - Free (5k transaction per month) and paid. In the paid plan, it costs approximately 1$ for every 1k of transactions (or cheaper). Learn more about pricing here.
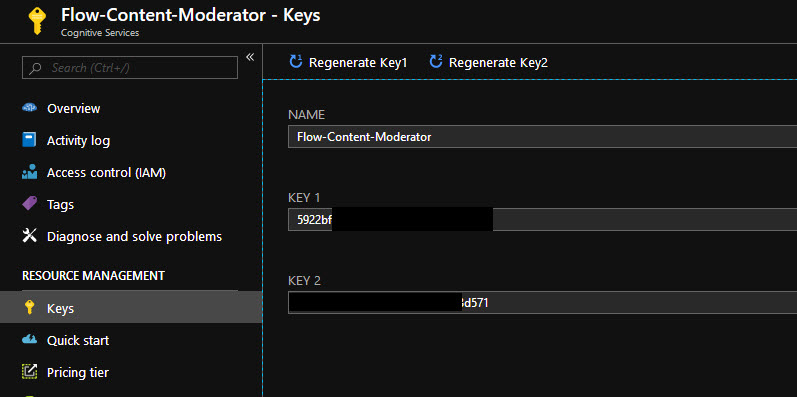
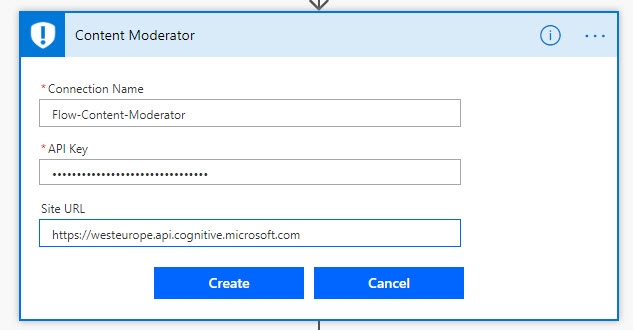
Now we need to save some details from your subscription to use later in MS Flow. In your Content Moderator resource click on Keys and save Name and Key1:
then click on Overview and save endpoint URL (without /contentmoderator part). So in my case, it is simply https://westeurope.api.cognitive.microsoft.com

We've done with Azure configuration.
Create your own moderation list with custom terms
If you want to extend the default list with some custom terms, you can create your own list with your organization specific terms. For the purpose of the demo, I will create a list with only one term. Do you like spoilers?

I hate spoilers! So let's add the words "spoiler" and "spoilers" in our exclusion list. Now if anybody posts a piece of news with the word "spoiler(s)", the news will be automatically rejected. Nice! We hate spoilers! :)
Content Moderator gives an API to create lists and terms inside lists. You can use any method or programming language to access the API. Additionally, you have an option to manage it from a web console. I'm going to use it for demo purposes. Open the link, then select your region, select the operation you want to perform in the left menu, fill in all required fields and you are good to go.
Here is an example of list creation experience:
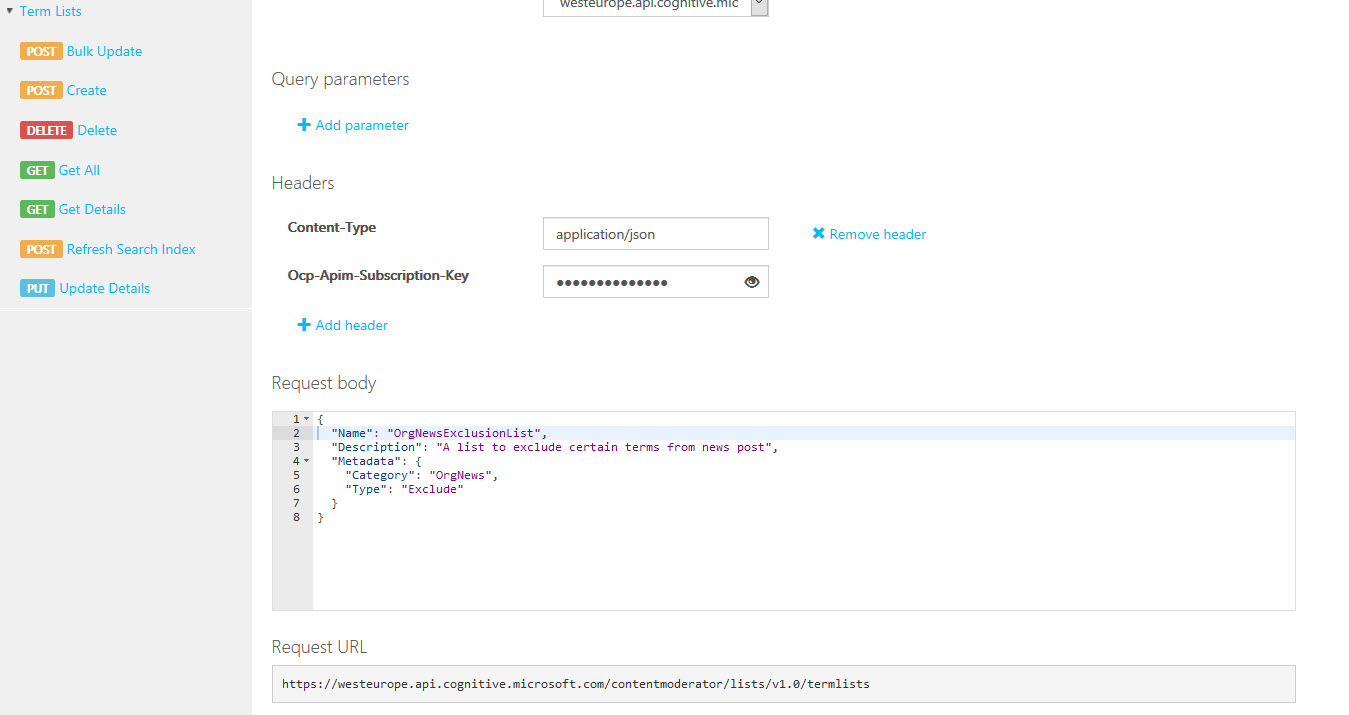
Click Send and the list will be created for you. Take a note on ListId, we need it later on.
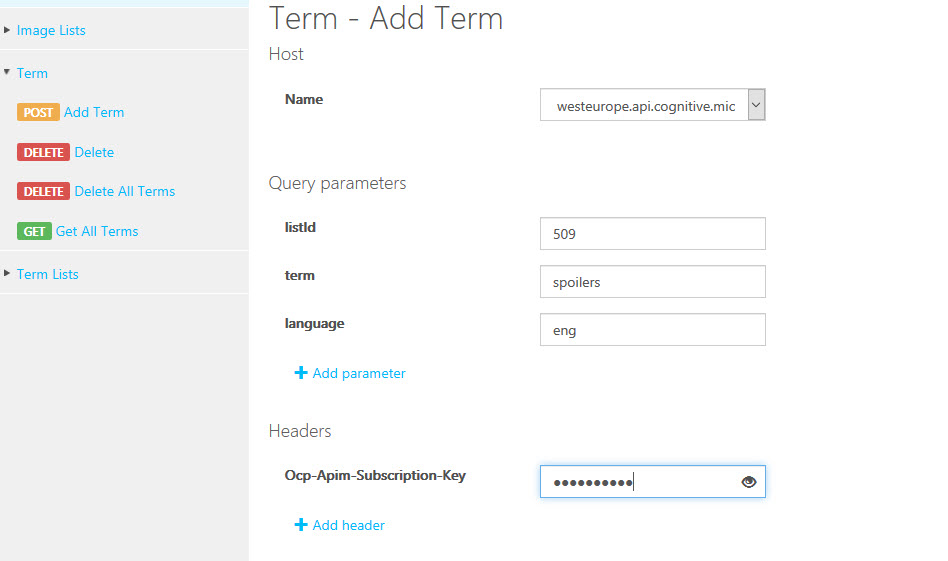
Now using the same technique add a new term for the newly created list:
Cool! Now we have our exclusion list ready. No spoilers anymore!
The Flow
News post text extraction
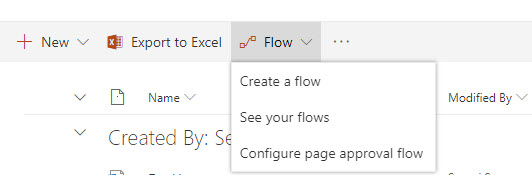
Configure default approval for you pages library by going to the library itself, clicking Flow and selecting "Configure page approval flow":
Now we're going to modify default flow created with out of the box page approval. Edit your newly created flow.
In the beginning, initialize two new variables:
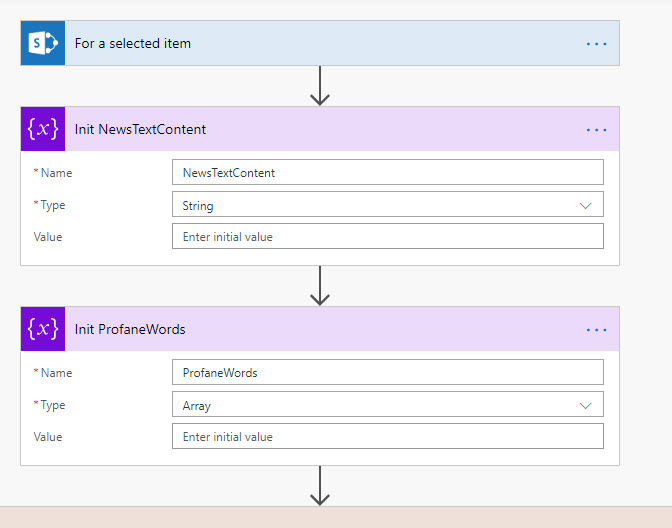
The first one, NewsTextContent will hold all text extracted from news post, next one, ProfaneWords is an array with all detected profane words (if any detected).
Next, I use condition in order to detect if a page is a news post (please refer to my other post on this technique):
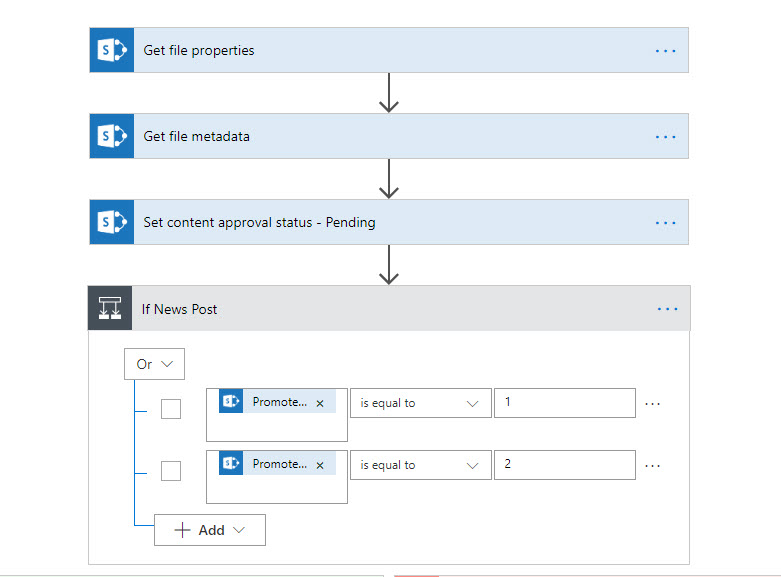
If a page is a news post page, we will perform all the magic.
The first task is to extract text content from the news post. I use SharePoint REST API _api/sitepages for that purpose. For example, the request to _api/sitepages/pages(id) returns all detailed information about the page. The most interesting field for us is "CanvasContent1". This field contains JSON formatted values for all the web parts used on the page. Usually, you put text in a special Text web part on modern pages:

This text can be easily extracted from "CanvasContent1" field. Here is an example of "CanvasContent1" field value:
[{
		"controlType": 4,
		"displayMode": 2,
		"id": "d31f9477-e63a-47e3-a2c3-db4456fd6e69",
		"position": {
			"zoneIndex": 1,
			"sectionIndex": 1,
			"controlIndex": 1,
			"layoutIndex": 1
		},
		"emphasis": {},
		"anchorComponentId": "d31f9477-e63a-47e3-a2c3-db4456fd6e69",
		"editorType": "CKEditor",
		"addedFromPersistedData": true,
		"innerHTML": "<p>my text goes here</p>\\n\\n<p>wow cool!</p>"
	}, {
		"controlType": 4,
		"displayMode": 2,
		"id": "82f17bf1-d88c-415d-96c7-c95a91c8b800",
		"position": {
			"zoneIndex": 2,
			"sectionIndex": 1,
			"controlIndex": 1,
			"layoutIndex": 1
		},
		"emphasis": {},
		"anchorComponentId": "82f17bf1-d88c-415d-96c7-c95a91c8b800",
		"editorType": "CKEditor",
		"addedFromPersistedData": true,
		"innerHTML": "<p>new text!!!!</p>"
	}, {
		"controlType": 3,
		"displayMode": 2,
		"id": "2afccd36-f7a8-4dda-812b-1a9077a8cdc7",
		"position": {
			"zoneIndex": 3,
			"sectionIndex": 1,
			"controlIndex": 1,
			"sectionFactor": 6,
			"layoutIndex": 1
		},
		"webPartId": "daf0b71c-6de8-4ef7-b511-faae7c388708",
......
Take a note on "InnerHTML" key. This is our text. In order to extract all the text from news post, we should iterate over all controls in an array (from "CanvasContent1"), find "innerHTML" value and append to a variable.
Let's do it in Flow:
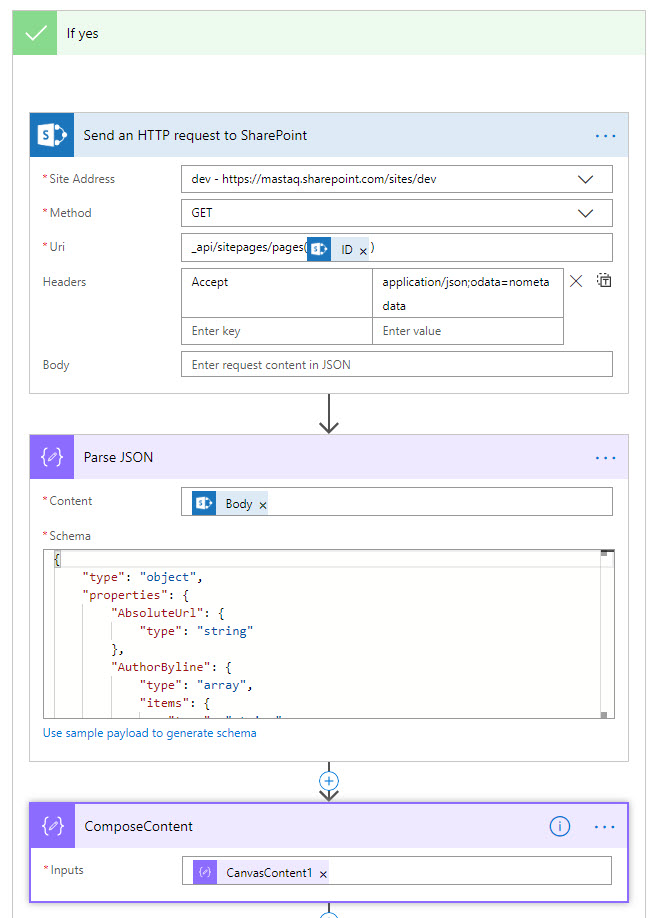
If "Yes" means we are on the "it's a news post" branch. What we're doing here? We send a request to SharePoint REST API to get the interesting page. Then we parse body response using sample payload. And finally, we compose a variable which stores the value of "CanvasContent1" field (JSON with web part data).
Next step is to iterate over all web parts data in "CanvasContent1" and store all text in a variable. This is exactly what is happening in the next few steps:
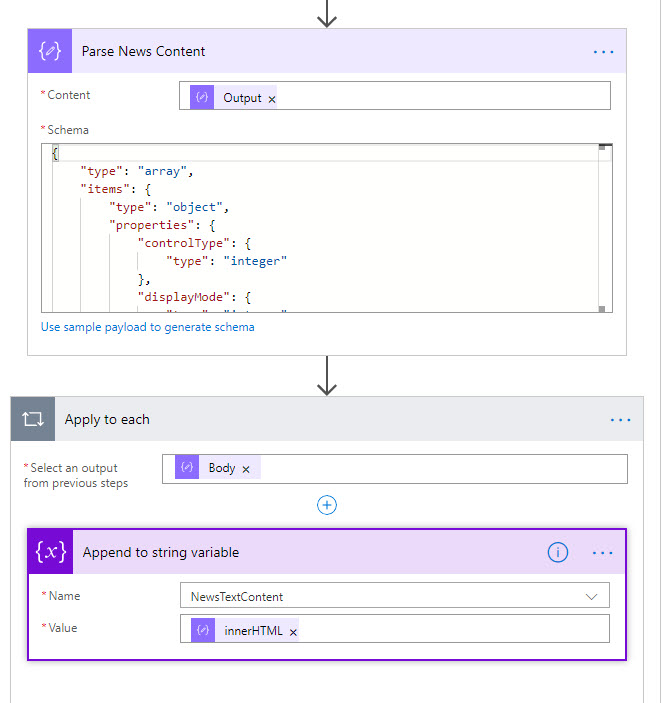
We parse web part's JSON, iterate using Apply to each step and append all text in our NewsTextContent variable.
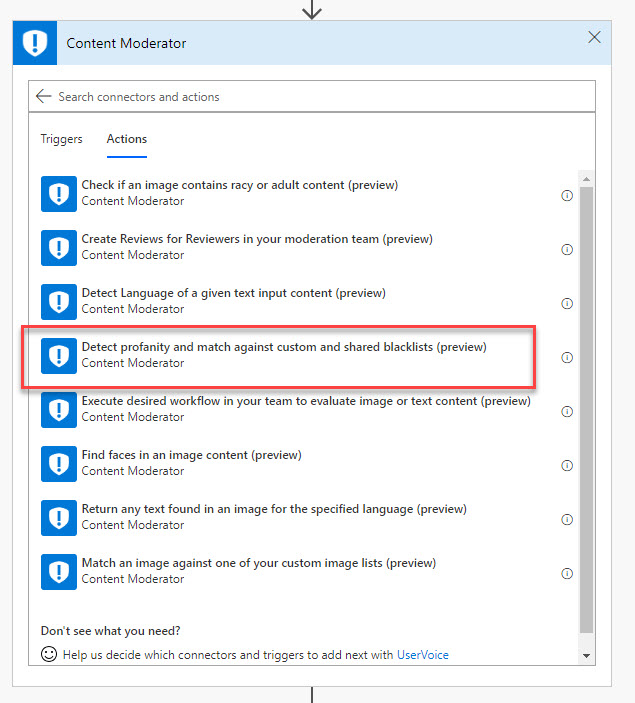
Content moderation action
Now it's time for Content Moderator to jump into the flow. Search for Content Moderator actions and select "Detect profanity....". Also, check out how many other interesting actions are available.
NOTE: Content Moderator actions are currently in preview
You will be asked about connection information. Fill in fields using information saved before from your Azure account:
Configure Content Moderator action - as text content put NewsTextContent variable, insert your ListId (509 in my case), set Classify input = yes, PII = yes:
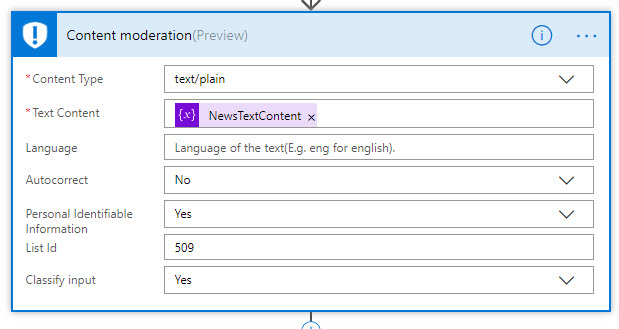
NOTE: Actually Content-Type should to be text/html, because I post html content, however, it didn't work for me, probably because it's still in preview.
NOTE: Make sure that your connection for Content moderation action isn't added to run-only users. Most likely your users don't have Azure permissions, thus you should not use run-only users for this connection.
Analyze results and make decisions
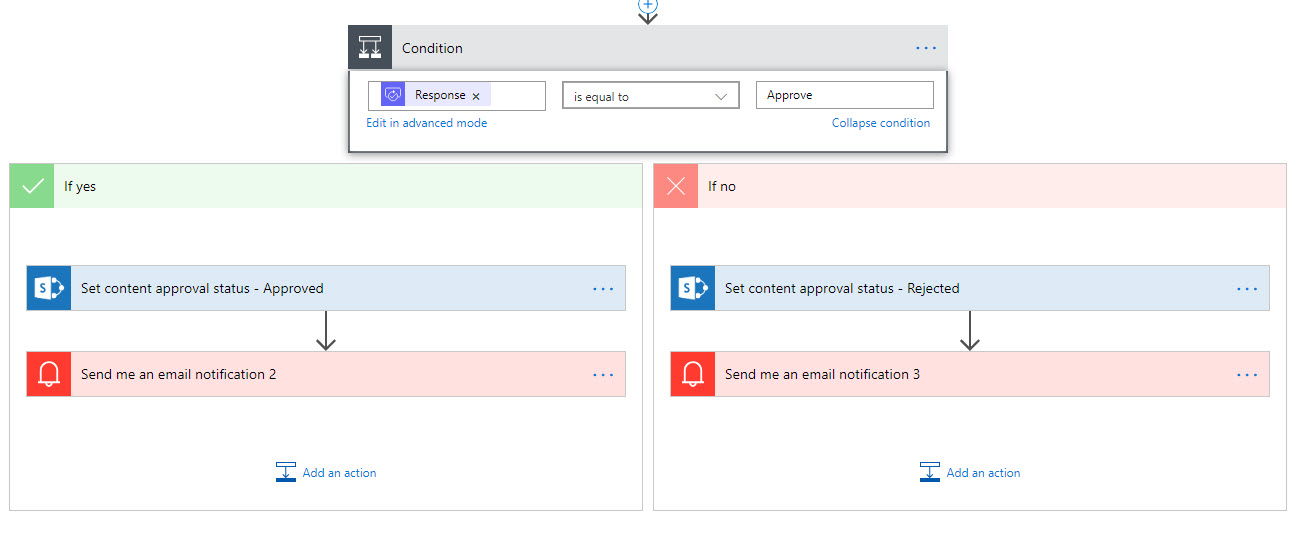
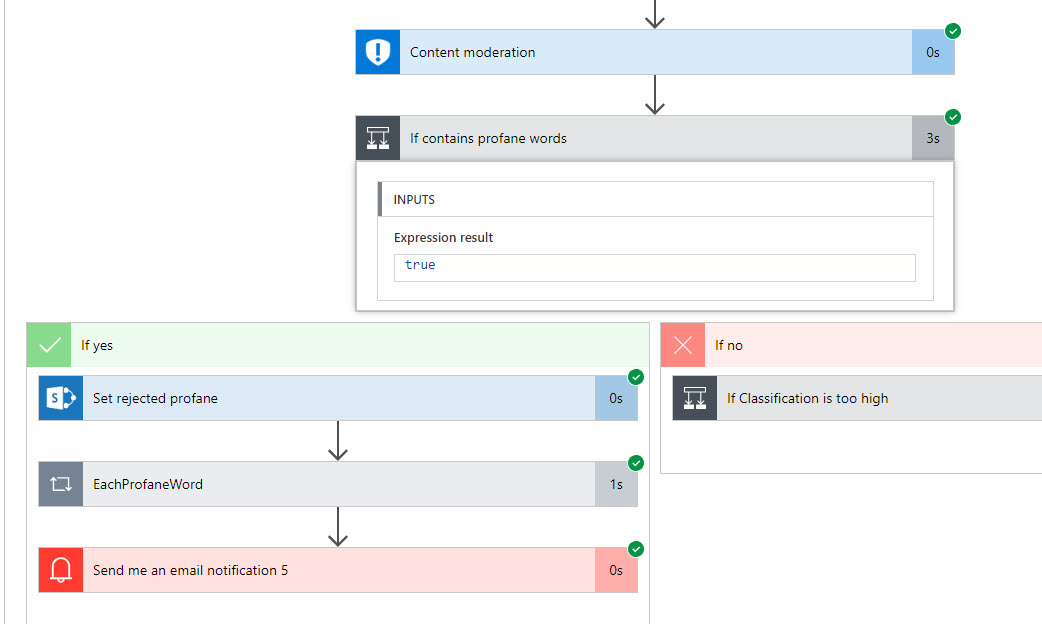
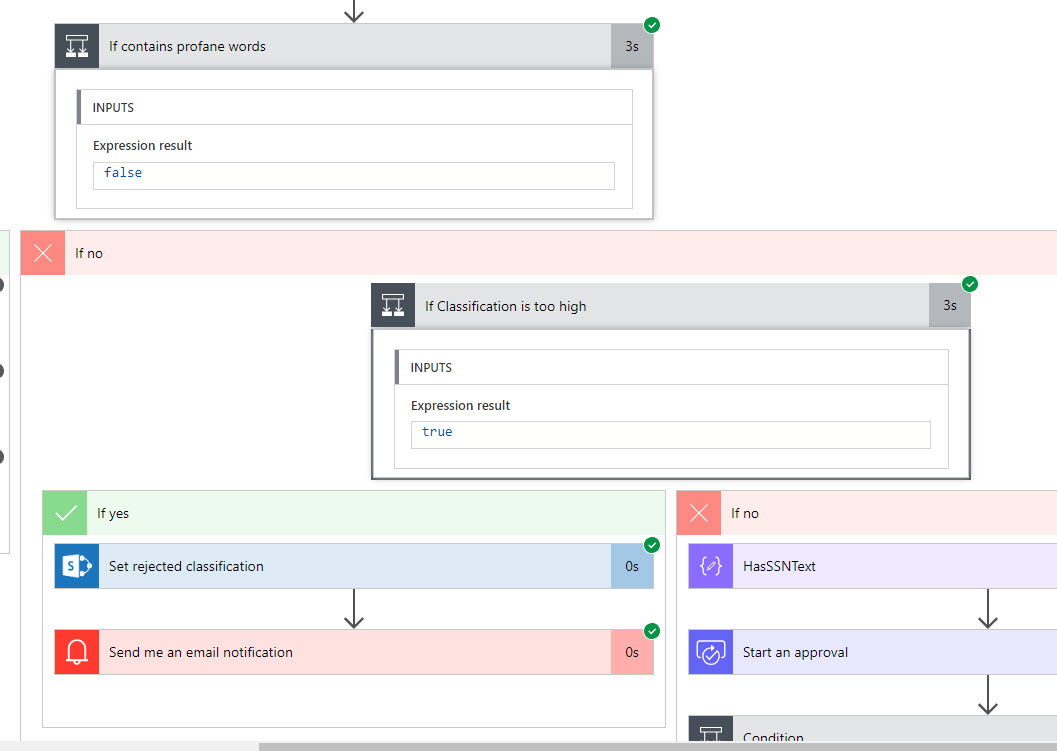
Now let's check if the result contains profane words:
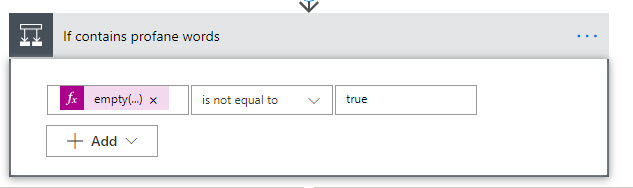
The formula is empty(body('Content_moderation')?['Terms'])
If yes (has profane language) we set content approval status to rejected and populate an array with all profane words detected:
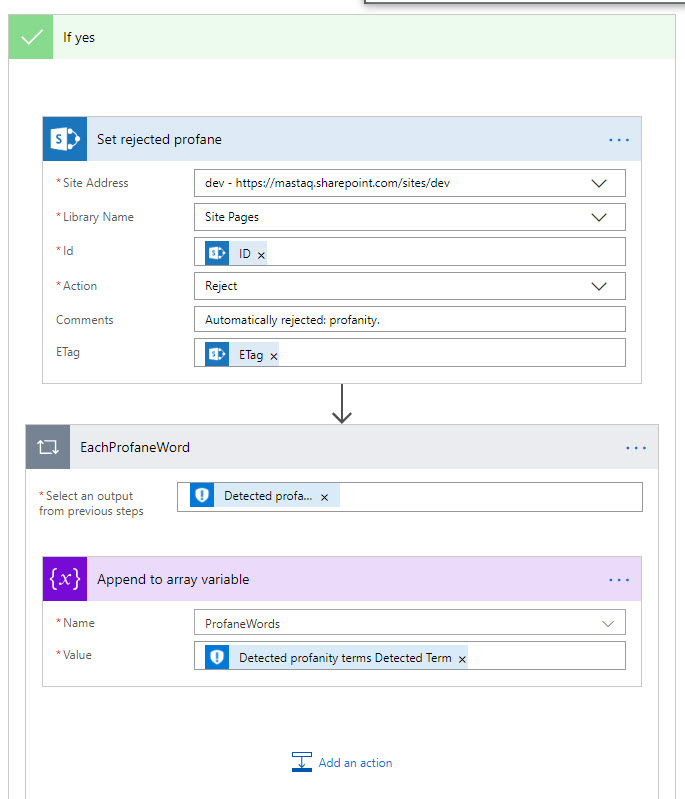
and finally sending a message to the user that the submission was rejected:
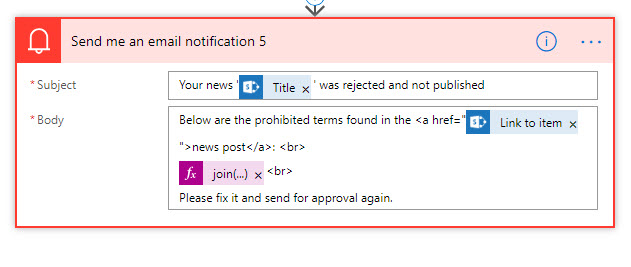
The formula is join(variables('ProfaneWords'), ',')
Cool, what if our text doesn't have profane words? Let's go to "No" branch. According to our initial plan, we should check if classification is OK in order to proceed:
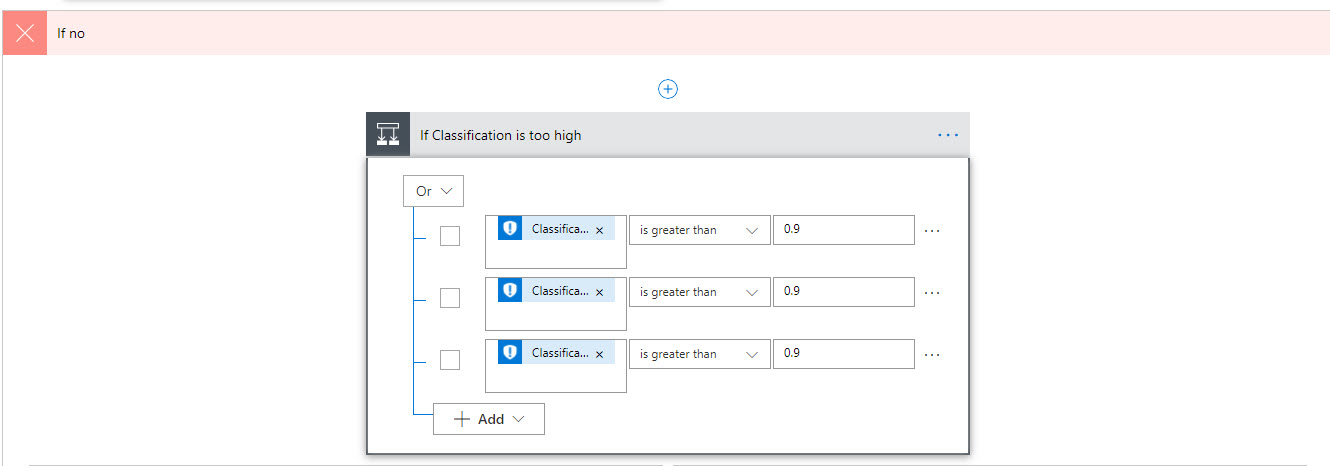
Learn more about different classifications here. The formula to check is body('Content_moderation')?['Classification']?['Category1']?['score'] (three categories are being checked).
If Yes (classification too high, which means the text most likely isn't good):
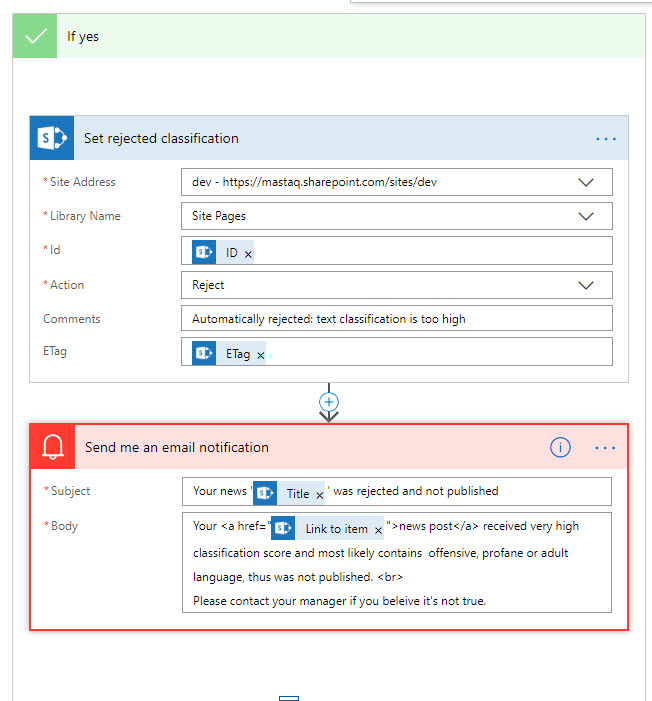
We reject the submission with an appropriate message.
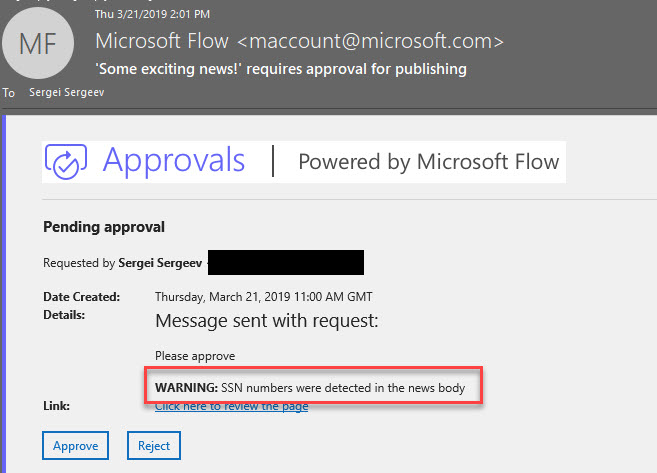
If the classification is OK, we check for Personally Identifiable Information (PII) presence. For simplicity, I check for SSN numbers only:
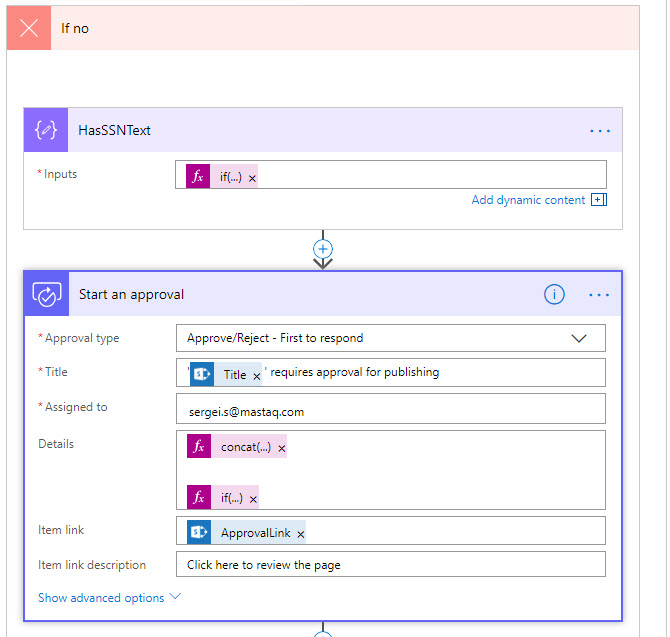
The formula for HasSSNText action is if(not(empty(body('Content_moderation')?['PII']?['SSN'])), 'has ssn', null)
And finally in the approval email, we add an indication that SSN was detected via If formula: if(not(empty(actionOutputs('HasSSNText'))), '**WARNING:** SSN numbers were detected in the news body', '')
The rest is just a regular end of an approval process in a flow:
Testing
Let's make a few tests to see how it works in real life.
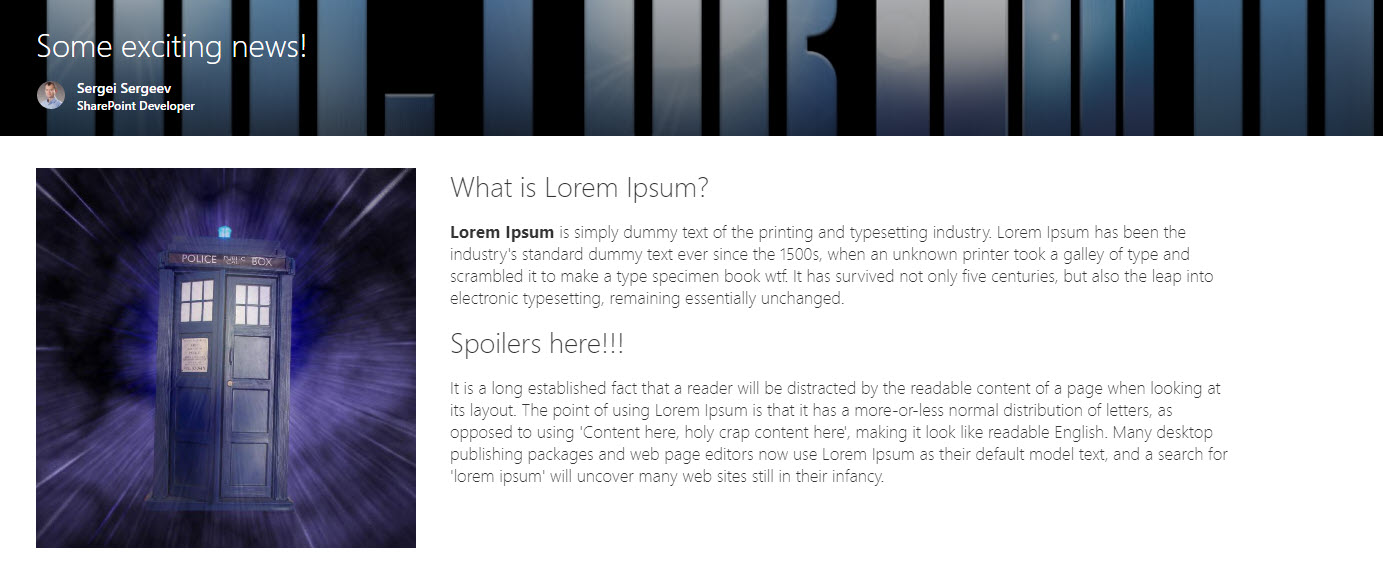
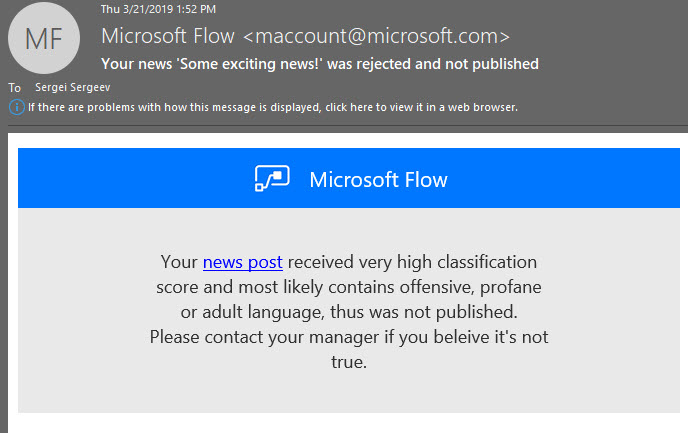
I've created a news post with some stop words inside:
Let's send it for approval.
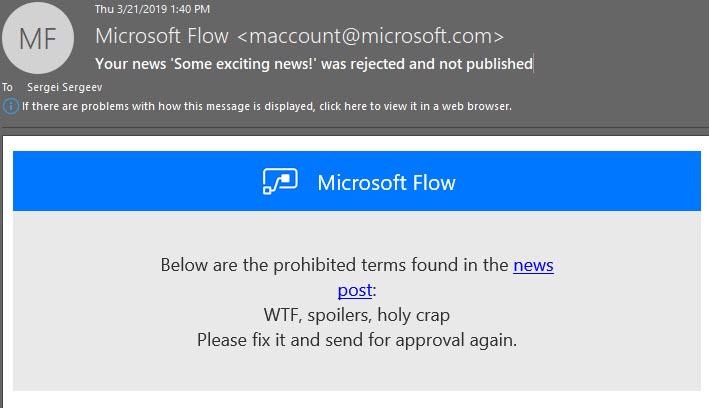
Wow, it looks like my text contains way more prohibited words than expected :). Take a note that "spoilers" is also here.
The flow took the left path:
If we remove all profanity and insert a text with high classification (don't ask me which text I used :)), we will receive another message:
This time classification path was taken:
And finally, let's add some SSN in our text. Content Moderator detects SSN data and the Flow automatically adjust description to indicate that:
Once again, the full flow is available here.
Conclusion
The main idea of this post is to showcase what is possible with modern tools and services in Office 365 and Azure area. 2-3 years ago you were not able to implement such kind of process without a lot of efforts and money. Today we can leverage new technology offered with cloud services to build amazing business processes without pain.
Azure Content Moderator is an example of such service, it's a powerful platform for media moderation. It's possible to use it with a variety of moderation or approval tasks in modern SharePoint. You can moderate news, images, texts, etc. However, keep in mind below things:
- currently, corresponding flow actions are in the preview
- as of now, text moderation has a limit of 1k of characters
Image credits:
Technology vector created by rawpixel.com - www.freepik.com