Simplify secret keys management for M365 applications with Azure Key Vault and Azure Managed Identity

Azure Key Vault simplifies a lot of things when it comes to secrets, passwords, certificate management. There are a lot of different ways of using it for different apps or services. In this post I’m going to cover below scenario:
- we have a service, running in the background, which connects to SharePoint API and performs some operations. As a good example, it might be a SharePoint PnP provisioning process running as a daemon through azure functions or azure web job
- the provisioning process uses Application permissions to access SharePoint API, thus uses certificate-based authentication through Azure AD auth
- all authentication secrets (certificate in our case) are stored in Azure Key Vault
- we do not store any secrets anywhere except Azure Key Vault (not locally in code and not in the azure function or job configuration)
- we use a brand new PnP Framework!
Interesting? Then please read further below.
Table of Contents
- Configure Key Vault
- Configure an app registration for SharePoint API access
- Code it (manual way)
- Code it (smarter way)
- Configure Azure Managed Identity
Configure Key Vault
Create a key vault for your app
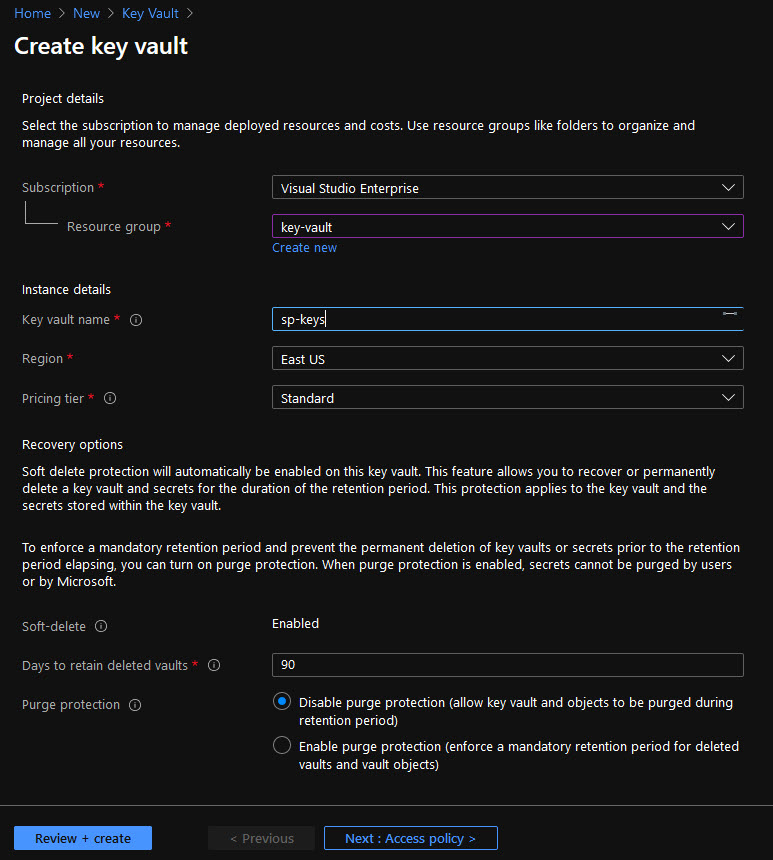
We’re going to store certificate data in our key vault, so let’s create a key vault first (with the name “sp-keys”):
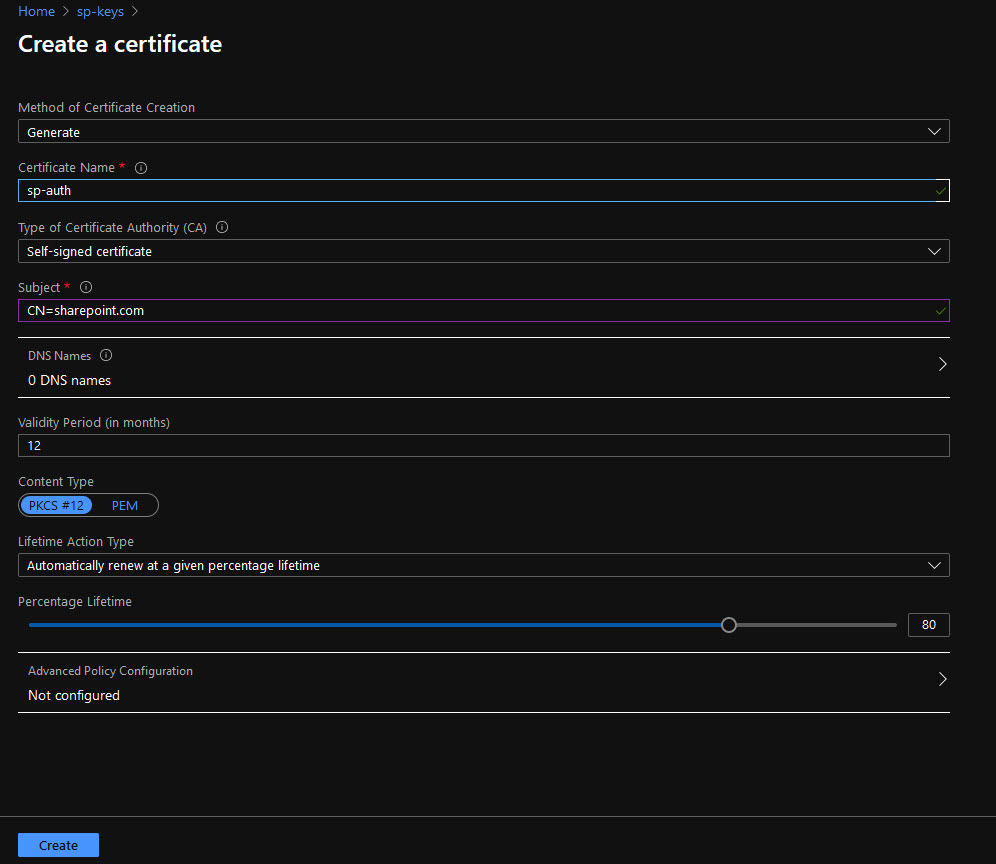
Generate a new certificate in the key vault
The certificate will be used for SharePoint API authentication later on.
Go to your newly created key vault and click Certificates in the left, then Generate/Import. Fill in the fields according to the image below (you can adjust some values to fit your personal needs, like common name, lifetime, etc) For testing purposes I’m creating a self-signed certificate. For even greater security you can of course request a certificate from a trusted CA:
Configure an app registration for SharePoint API access
Create a new app registration
HINT. Your key vault and app registration can be in different tenants\accounts.
We need an app registration if we wish to access some organizational resources. I think you’re very well familiar with this process, however here are the steps.
1. Under your target tenant go to App Registration and a new app. Give it a name:
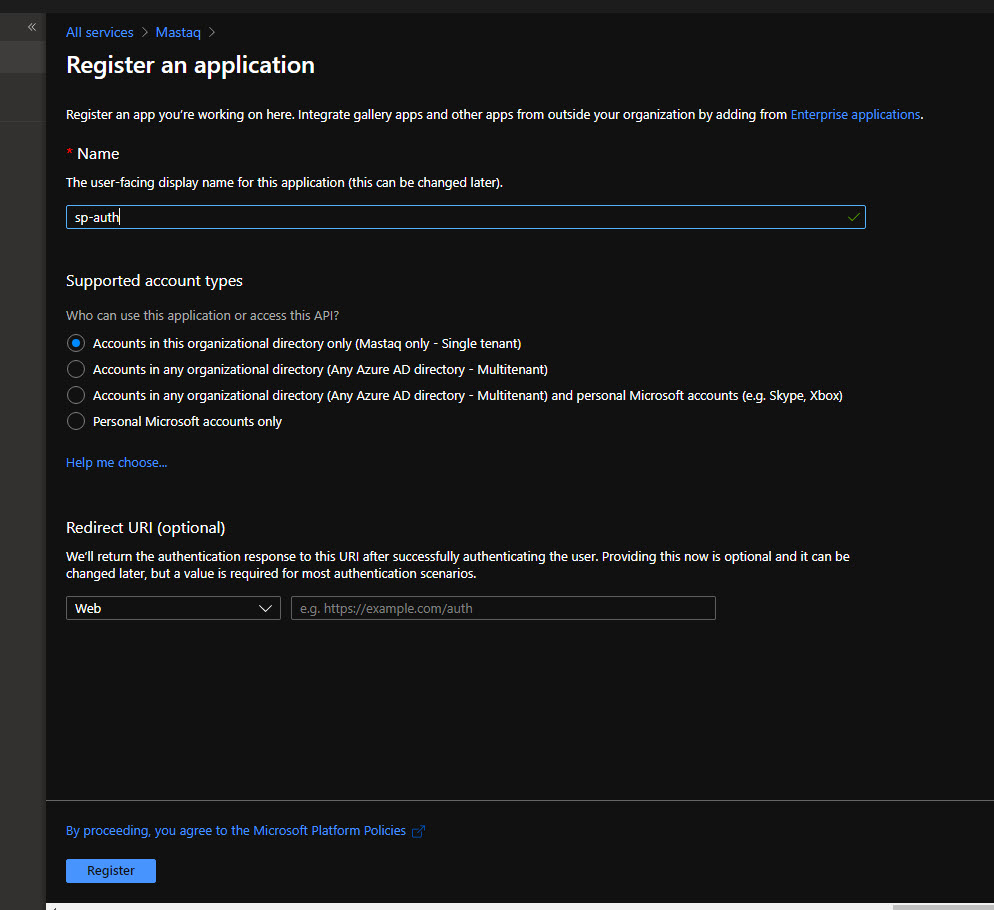
Take a note on TenantId and ClientId (we need them later on in code).
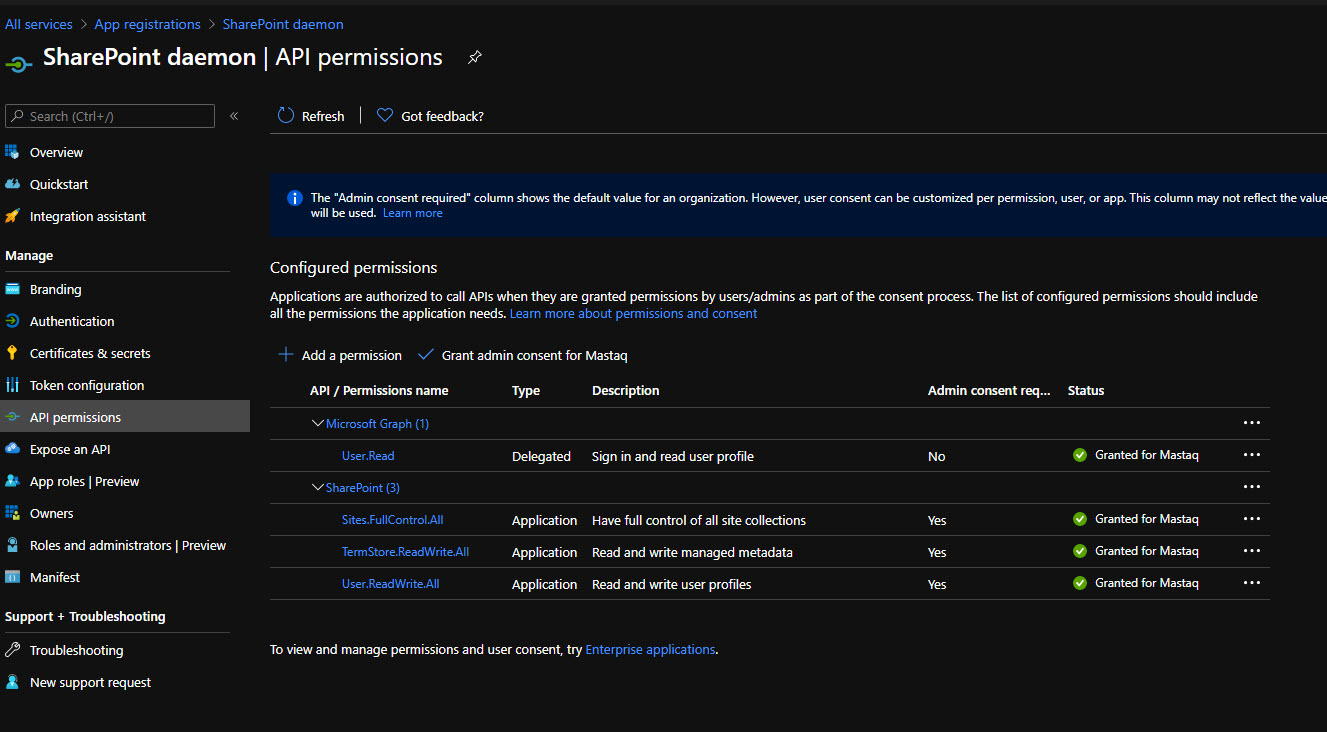
2. Under API Permissions add SharePoint permission and click on “Grant admin consent”:
Import certificate from the key vault
1. Go back to your key vault. Click on your certificate, then on the current version. At the top click “Download in CER format”. Save .cer file somewhere.
2. Switch back to the app registration and select “Certificates and Secrets”. Click “Upload certificate” and select a .cer certificate you saved before.
Code it (manual way)
For the app we need the below NuGet packages:
- Azure.Identity
- Azure.Security.KeyVault.Secrets
- PnP.Framework
At the first step in code, we have to obtain a reference to the certificate using X509Certificate2 class. Below is all code we need:
public static async Task<X509Certificate2> GetCertificate(string keyVaultUri, string kvCertificateSecretName)
{
	var secretClient = new SecretClient(new Uri(keyVaultUri), new DefaultAzureCredential());
	var secretResponse = await secretClient.GetSecretAsync(kvCertificateSecretName);
	var secretData = secretResponse.Value;
	return new X509Certificate2(Convert.FromBase64String(secretData.Value));
}
Where keyVaultUri is your key vault URL (you can find it under key vault properties -> Vault URI).
kvCertificateSecretName is the name of certificate secret. When a key vault creates a new certificate, it stores public and private parts. Think about a private part like a pfx secret. Normally the name of this secret is equal to the certificate name, but it’s better to grab it from the certificate’s details page - it’s called “Secret Identifier” and contains a URL like “https://sp-keys.vault.azure.net/secrets/sp-auth/
The most exciting thing here is DefaultAzureCredential class. This class silently performs heavy work for authentication. Remember, we don’t store any credentials locally (not for SharePoint API nor for the key vault). So how does this magic work?
DefaultAzureCredential has a predefined set of authentication strategies. It iterates over all of them and uses the first succeeded strategy. Here is the full list:
- EnvironmentCredential
- ManagedIdentityCredential
- SharedTokenCacheCredential
- VisualStudioCredential
- VisualStudioCodeCredential
- AzureCliCredential
- InteractiveBrowserCredential
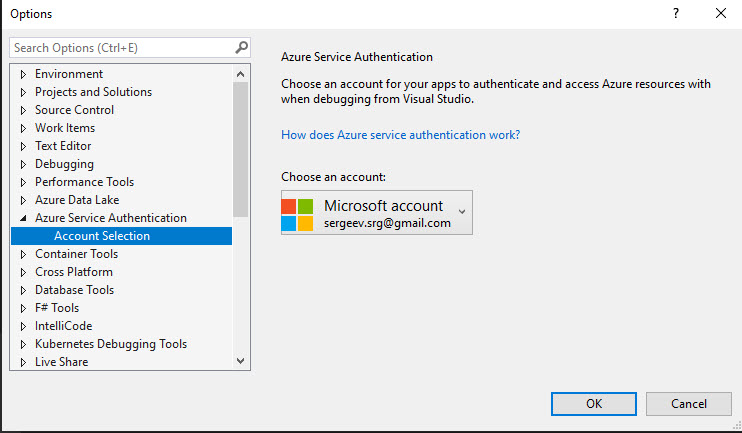
Read more about it here. If you don’t have permissions configured for any of these strategies locally, then it will fail. The simplest option is just to sign in with the required account into visual studio or visual studio code (depending on what you’re using). This is how setup looks like for Visual Studio (it’s under Options):
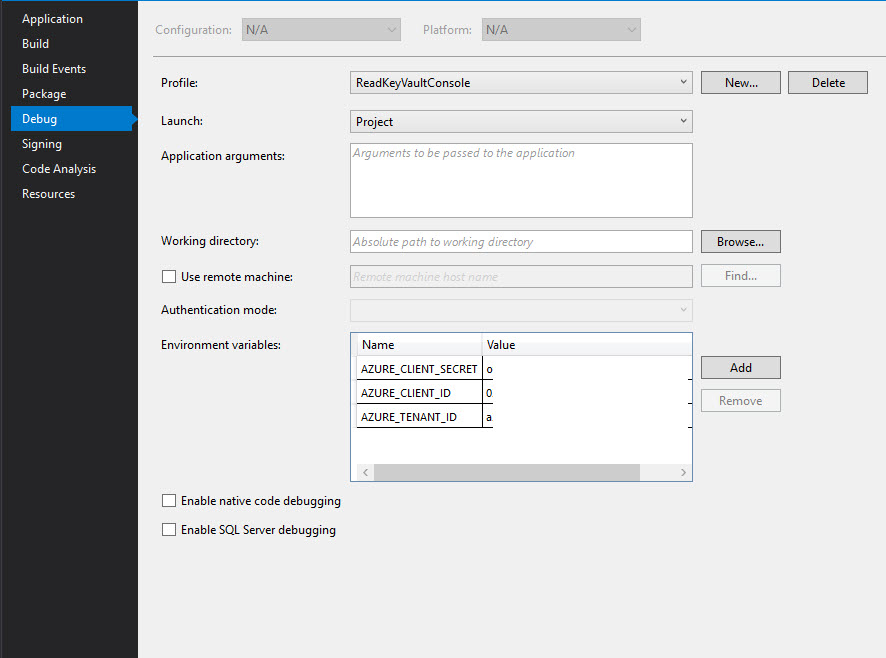
If it doesn’t work for you, you can configure Client Credential authentication for accessing your key vault when debugging. You need to create a new app registration in the tenant with the key vault, generate a client secret. Then under the key vault access policies add a new policy selecting your app registration and adding required permissions. After that update Visual Studio with the below environment variables:
And finally below are just a few lines of code to create a ClientContext with PnP Framework:
var kvUri = "https://sp-keys.vault.azure.net/";
var kvCertificateSecretName = "sp-auth";
var clientId = "3b805493-2c63-42f8-a0b5-86e9d1c2a287";
var tenantId = "d2a410c1-dc63-444f-99b4-1a943e8c8d1d";

var cert = await GetCertificate(kvUri, kvCertificateSecretName);
var authManager = new AuthenticationManager(clientId, cert, tenantId);
var clientContext = await authManager.GetContextAsync("https://mastaq.sharepoint.com/sites/demo");
Code it (smarter way)
In the previous code example, we obtained a certificate from a key vault and then initialized a new ClientContext instance. In real life your code runs in different applications - whether it an azure web app, a function, or a provisioning web job, you always have an option to configure your hosting environment to automatically extract all needed secrets without any additional coding (of course it’s valid only for Azure platform).
All mentioned hosting solutions have a step called “ConfigureAppConfiguration” when used from C#. Among other things, in this step, you can assign additional configuration sources for your app.
Basically, you just need to add these two lines of code
var secretClient = new SecretClient(new Uri("https://sp-keys.vault.azure.net/"), new DefaultAzureCredential();
config.AddAzureKeyVault(secretClient, new KeyVaultSecretManager());
so that all your key vault secrets will be available under the Configuration object.
Later on, in ConfigureServices you can add configuration credentials as a dependency injectable object:
var azureCreds = context.Configuration.GetSection(AzureAdCreds.SectionName).Get<AzureAdCreds>();
services.AddSingleton(azureCreds);
You can scope your credentials to a specific configuration section, like in the example above. In this case, in order for key vault secrets to be mapped correctly, you should use prefixes for all secret names. I.e. if your section has the name “AzureAdApp”, then use the below names in Azure Key Vault:
- AzureAdApp—CertificateKey
- AzureAdApp—ClientId
- AzureAdApp—ClientSecret
- etc
If you don’t want to use AzureKeyVault during development, you can use user secrets feature. In this case, you should store your settings in a secret json file using below format:
{
  "AzureAdApp": {
    "ClientId": "3b805493-2c63-42f8-a0b5-86e9d1c2a287",
    "TenantId": "d2a410c1-dc63-444f-99b4-1a943e8c8d1d",
    "CertificateKey": "MIIKQAIBAzCCCfwGCSqGSIb3DQEH....."
  }
}
You should also update ConfigureAppConfiguration so that it only adds key vault in production mode:
if (context.HostingEnvironment.IsProduction())
{
	var secretClient = new SecretClient(new Uri("https://<your vault>.vault.azure.net/"), new DefaultAzureCredential();
	config.AddAzureKeyVault(secretClient, new KeyVaultSecretManager());
}

if (context.HostingEnvironment.IsDevelopment())
{
	config.AddUserSecrets<Program>();
}
I’ve created a code sample here to illustrate this approach. It uses Azure web jobs as a hosting environment but can be easily adapted to azure functions and web apps as well.
Now it works locally without managing or storing any secrets in the source code. How to configure it to work after deployment?
Configure Azure Managed Identity
If you remember, for DefaultAzureCredential the second authentication strategy is ManagedIdentityCredential. In short, you establish a trust between your Azure service (web app, function app, web job, VM, any service which supports Managed Identity). Upon execution, the code checks whether Managed Identity is enabled and if a trust is established between the key vault and your app. If yes, Azure authenticates the key vault and your code is able to read your secrets.
Once again - you don’t need any “secrets” in order to authenticate against your key vault store, everything is done internally by Managed Identity for you.
How to configure it? Very simple, two steps:
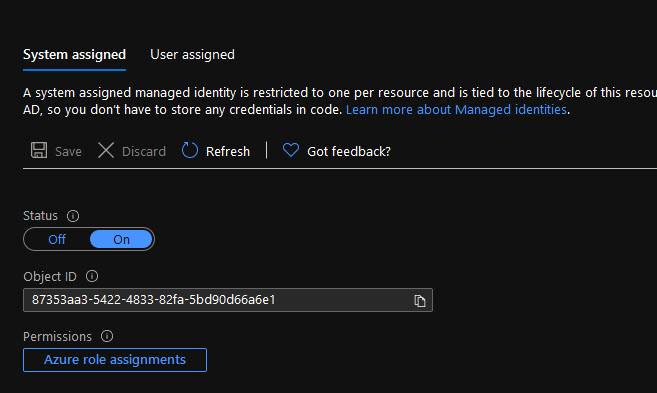
1. Go to your azure app (function, job, etc) and under Identity set Status to On:
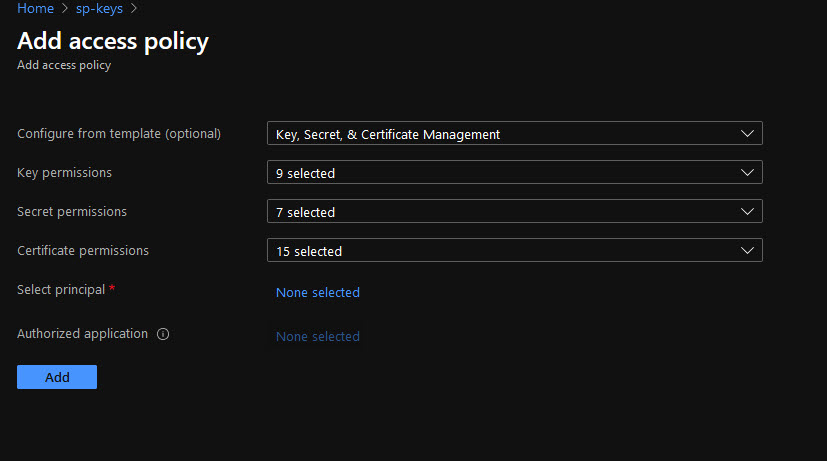
2. Now go back to the key vault and add a new access policy selecting your app as principal from the list and assign read or manage permissions:
Now, after deployment of your code to Azure, you don’t need to configure anything additional, nor updating app settings or connections string. It just works. You have context - you can start the provisioning process with PnP.
Title image credits - Photo by Caleb Oquendo from Pexels