Call Azure AD secured API from your SPFx code. Story #1.1: Azure Web App with ASP.NET Core 2.x and cookie authentication (xhr "with credentials")
Call Azure AD secured API from your SPFx code series:
- Call Azure AD secured API from your SPFx code. Story #1: Azure Functions with cookie authentication (xhr “with credentials”)
- Call Azure AD secured API from your SPFx code. Story #1.1: Azure Web App with ASP.NET Core 2.x and cookie authentication (xhr “with credentials”) <—you are here
- Call Azure AD secured API from your SPFx code. Story #2: Web app (or Azure Function) and SPFx with adal.js
- Call Azure AD secured API from your SPFx code. Story #3: Web app (or Azure Function) and SPFx with AadHttpClient
In the previous post, I showed an example on how to call Azure Functions API protected with Azure AD (using EasyAuth setup). Described approach has a few limitations, one which is the most important is an inability to send HTTP POST or PUT requests. This issue can be fixed by using regular ASP.NET Web API application with custom authentication layer. More info about this approach you can find here - Access the API by leveraging SharePoint Online authentication cookie. This post describes required steps to make it work:
- Add new app registration in Azure AD
- Create new ASP.NET Core application and setup authentication with Azure AD.
- Enable CORS for your web application with credentials support (so we can send CORS AJAX and attach credentials to our request, auth cookie in our case)
- Create simple SPFx webpart, which gets data from our web app via authenticated HTTP request (GET and POST).
The source code for this article available on GitHub here.
Let’s get started.
1. Add new app registration in Azure AD
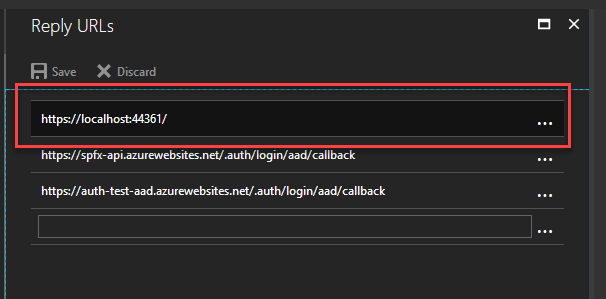
In Azure Portal, click Azure Active Directory –> App Registration. Create new registration using a Web app option and give any name for the app. Go to app Reply URLs and put callback url to your web app. We use locally running web app for testing, that’s why you can put https://localhost:44361/ (or any url where your web app runs locally):
Copy ApplicationID from the app properties. We need it in the next step. You should also copy your TenantId. In Azure Portal, you can click on Azure Active Directory once again and select Properties. Copy Directory Id.
2. Create new ASP.NET Core application and setup authentication with Azure AD.
For this step I’m not going to reinvent the wheel. You can go to Azure Samples on GitHub and use active-directory-dotnet-webapp-openidconnect-aspnetcore as a starting point for your app. After cloning the repository, open project in Visual Studio and update values in the appsettings.json file according to your tenant. Basically, you need to update Domain, TenantId, ClientId.
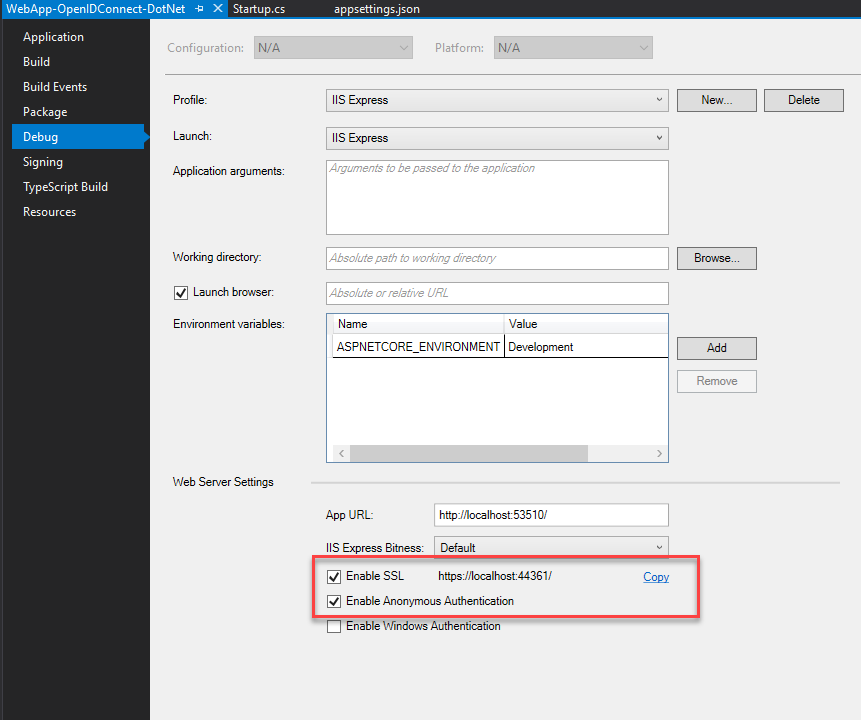
Open project properties and make sure that under Debug you have SSL enabled and Anonymous Authentication enabled as well:
Hit Ctrl+F5 to run your web app. Open your SSL url and check that the app redirects you to the Azure AD login page. Login into the directory and check that the app works.
3. Enable CORS for your web application with credentials support (so we can send CORS AJAX and attach credentials to our request, auth cookie in our case)
We are going to call our Web API from other domain. That’s why we need configure CORS. Our CORS also should support credentials. To add support, go to Startup.cs and add CORS to ConfigureServices and Configure methods. Your resulting code in both methods should be:
// This method gets called by the runtime. Use this method to add services to the container.
public void ConfigureServices(IServiceCollection services)
{
	services.AddAuthentication(sharedOptions =>
	{
		sharedOptions.DefaultScheme = CookieAuthenticationDefaults.AuthenticationScheme;
		sharedOptions.DefaultChallengeScheme = OpenIdConnectDefaults.AuthenticationScheme;
	})
	.AddAzureAd(options => Configuration.Bind("AzureAd", options))
	.AddCookie();

	services.AddCors(options =>
	{
		options.AddPolicy("AllowSpecificOrigin",
			builder =>
			{
				builder
					.WithOrigins(
						"https://localhost:4321") // after deployment this should be changed to real web app url
					.AllowAnyMethod()
					.AllowAnyHeader()
					.AllowCredentials();
			});
	});

	services.AddMvc();
}

// This method gets called by the runtime. Use this method to configure the HTTP request pipeline.
public void Configure(IApplicationBuilder app, IHostingEnvironment env)
{
	if (env.IsDevelopment())
	{
		app.UseDeveloperExceptionPage();
	}
	else
	{
		app.UseExceptionHandler("/Home/Error");
	}

	app.UseStaticFiles();

	app.UseAuthentication();

	app.UseCors("AllowSpecificOrigin");

	app.UseMvc(routes =>
	{
		routes.MapRoute(
			name: "default",
			template: "{controller=Home}/{action=Index}/{id?}");
	});
}
We also need to add API controller. Under Controllers folder add new file ClientsController.cs:
[Authorize]
[Route("api/[controller]")]
public class ClientsController : Controller
{
	private readonly ILogger _logger;

	public ClientsController(ILogger<ClientsController> logger)
	{
		_logger = logger;
	}

	[HttpGet]
	public dynamic Index()
	{
		var clients = new List<dynamic>
		{
			new
			{
				Name = "Tim Perez"
			},
			new
			{
				Name = "John Smith"
			}
		};

		return clients;
	}

	[HttpPost]
	public object PostData(object data)
	{
		_logger.LogInformation("Post data received!");

		return new
		{
			message = "data was successfully posted!"
		};
	}
}
Now we have our backend API fully configured. We can test it locally against SPFx webpart. You can deploy it to Azure Web App later without issues.
4. Create simple SPFx webpart, which gets data from our web app via authenticated HTTP request (GET and POST).
Generate new SPFx webpart using “No Javascript framework” option.
Paste below content in render function:
public render(): void {
    let apiUrl = 'https://localhost:44361/';

    this.domElement.innerHTML = `
      <div><iframe src="${apiUrl}"></iframe></div>`;

    this.domElement.querySelector("iframe").addEventListener("load", (): void => {

      this.context.httpClient.fetch(`${apiUrl}api/clients`,
        HttpClient.configurations.v1, {
          credentials: "include",
          method: "GET"
        })
        .then((response: HttpClientResponse): Promise<any[]> => {
          if (response.ok) {
            return response.json();
          } else {
            return Promise.resolve(null);
          }
        })
        .then((data: any[]): void => {
          console.log(data);

          this.context.httpClient.fetch(`${apiUrl}api/clients`,
            HttpClient.configurations.v1, {
              credentials: "include",
              method: "POST",
              body: JSON.stringify({data: 'mydata'})
            })
            .then((response: HttpClientResponse): Promise<any[]> => {
              if (response.ok) {
                return response.json();
              } else {
                return Promise.resolve(null);
              }
            }).then(console.log).catch(console.log)
        })
        .catch((error: any): void => {
          console.log(error);
        });
    });
  }
The code is pretty self-explanatory. It simply sends to HTTP requests (GET and POST) to our backend WEB API. Run gulp serve and you can test it against the local workbench. Of course, your web app also should be running. How does it work? The same way as in the previous post, however, I added it here once again:
The idea behind this approach is very simple. As you are at the same tenant, your iframe should be automatically redirected to your web app home page (thankfully to SSO). After redirection authentication cookie will be stored in your browser. credentials: “include” makes it possible to send cookies with AJAX request, that’s why the request is successful and we have our data back. The important thing is CORS setup in our web app.
Again, the sources are here at GitHub.
Conclusion
This is another option you can use when calling Azure AD secured API from your SPFx code. It uses iframes, that’s why has the same cons:
- because of iframe nature, you might have issues with IE security zones
- you can query only your own API, you can’t use the same approach for MS Graph for example or any other Office 365 related API
- you can’t provide wildcard (*) in CORS setup and you can’t provide multiple domains – only one allow-origin domain is possible
In next post I will show how to do the same thing (call secured API from SPFx) using a popular adal.js library.
UPD #1:
Nice security feature introduced by @Russell (in comments section) - you can add security trimming into your Web API controllers by user’s Azure AD group membership:
You just need to go to your App Registration in azaureAD and click the Edit Manifest button up top. Change the value of GroupMembershipClaims to “SecurityGroup”:
"errorUrl": null,
"groupMembershipClaims": "SecurityGroup",
"optionalClaims": null,
and then the groups are passed to your webapi.
In the webapi, you can then just decorate your controllers with [System.Web.Http.Authorize(Roles = “someazureadgroupname”)]
Works like a champ!
UPD #1:
@desserayh had issues with authentication when the app was deployed to Azure. Here is how he managed to resolve it:
The application gets stuck in what seems to be an authorization loop between the web app’s login authorization and the /signin-oidc callback path.
Edit: Upon a bit of further investigation, it seems to be authorizing fine, but unable to save the cookies due to their size, so after being redirected to home page it can’t find the authed cookies and therefore attempts the login/auth again.
Edit 2: After some trial and error and a lot of googling, I managed to get it working by adding an extra option to the .AddCookie method in the Startup.cs
.AddCookie(options => {
options.Cookie.SameSite = SameSiteMode.None;
});
This managed to correct my infinite loop problem.