Sometimes you need to adjust SPFx build pipeline a bit, in order to add your own webpack loaders or modify configuration for some tasks. This can be done in different ways depending on your needs. Let’s try to take a closer look at the options available. Below is a diagram showing common config flow with extensibility points:

There are two places where you can put your customizations – under custom task’s config adjustments or using configuration file under config/[task name].json during loadCustomConfigs() method. More...
I’ve heard about Power BI and Power BI Desktop a lot, but have never tried these tools before. So I decided to make an analysis of some popular questions and answers forum - http://sharepoint.stackexchange.com with help of Power BI Desktop. If you are SharePoint person (developer, admin, power user, etc.) that’s a big chance that you have visited this site before or maybe you are even frequent visitor. In this post, you will find a lot of images, graphics, trends, tables, maps, charts and so on. All made with great tool Power BI Desktop and Stack Exchange API as a data source. Some advanced data was collected with help of Google Maps Geocode API and nodejs webpages scrapper – osmosis.
The data was grabbed from sharepoint.stackexchange at the beginning of January 2017. Most of the data is filtered starting from the 2010 year because a relatively small number of questions were created before 2010 (around 200).
NOTA: all thoughts here are just my thoughts and may be incorrect or not aligned with yours. Please, share your opinion in comments.
Basic data
Let’s start with some basic information available:

More...
Hi all. During digging into different sharepoint *.debug.js files I also investigating into sp.ui.dialog.debug.js. Out of the box modal dialog framework has some number of methods for manipulating dialog window, but some methods (that might be useful) missed. For example programmatically maximize or restore dialog window. Here is a couple of extension methods that I’ve created:
- maximize - maximizes modal dialog window
- restore - restores modal dialog window
- toggleView – maximizes if modal dialog window is not maximized and vice versa
- setSize – set size for modal dialog window (height, width in pixels)
Here is the code:
ExecuteOrDelayUntilScriptLoaded(function(){
	SP.UI.ModalDialog.prototype.toggleView = function () {
		this.$z(null);
	};
	SP.UI.ModalDialog.prototype.maximize = function (){
		if(!this.$S_0){
			this.$z(null);
		}
	}
	SP.UI.ModalDialog.prototype.restore = function (){
		if(this.$S_0){
			this.$z(null);
		}
	}
	SP.UI.ModalDialog.prototype.setSize = function (width, height){
		if(typeof width == "number" && typeof height == "number") {
			this.$Q_0(width, height);
		}
	}
}, "sp.ui.dialog.js");
Example of use:
var dlg = SP.UI.ModalDialog.get_childDialog();
dlg.toggleView();
Enjoy and good luck in spdevelopment.
Hi all! Today I’m going to show example of how to write clean and understandable code when using feature upgrade. Of course, solution which we are using is not perfect, but it rather solid, easy to use, easy to read, easy to extend. If you have any suggestions, improvements, or event better and cooler solution – you are welcome in comments :). Ok, lets start.
You are already know, that with sharepoint 2010 you can upgrade your features by adding this sample xml:
<UpgradeActions>
    <VersionRange BeginVersion="0.0.0.0" EndVersion="0.0.0.09">
      <CustomUpgradeAction Name="SomeActionName">
        <Parameters>
          <Parameter Name="TitlePrefix">Upgrade Time:</Parameter>
        </Parameters>
      </CustomUpgradeAction>
    </VersionRange>
</UpgradeActions>
CustomUpgradeAction is not the only allowed tag inside VersionRange, but I’m going to focus on it, because with this tag we can specify actions, which invokes by code. To use above action you need to specify upgrade actions receiver and override FeatureUpgrading method. Very straightforward and simple implementation of this method for our above example can looks like this one:
public override void FeatureUpgrading(SPFeatureReceiverProperties properties, string upgradeActionName, System.Collections.Generic.IDictionary<string, string> parameters)
{
	switch (upgradeActionName)
	{
		case "SomeActionName":
			var web = properties.Feature.Parent as SPWeb;
			var list = web.Lists["TestUpgradeList"];
			var item = list.Items.Add();
			item["Title"] = parameters["TitlePrefix"] +  DateTime.Now.ToShortTimeString();
			item.Update();
			break;
		case "AnotherAction":
			//do other stuff
			break;
	}
}
Pretty cool, but what if you have 20-30 different actions? More...
Hi all! This is my revisited post from this one. I am going to show how we can call and test feature upgrade methods directly in visual studio. Lets start.
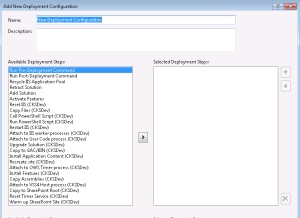
We need visual studio and CKS Dev extensions. CKS Dev adds additional deployment steps into your sharepoint project. Among them Upgrade Solution. This command simply run Update-SPSolutioncmdlet(or may be stsadm analog). To upgrade feature we need to call Upgrade explicit on the feature. CKS Dev hasn’t step “Upgrade feature”, that’s why we will use “Run PowerShell Script” step to upgrade particular feature. We start from creating custom deployment configuration.
Make this deployment configuration active. Create new folder under solution, for example “Scripts” and add new .ps1 file that will contain upgrade logic. As you remember, the first command in our deployment configuration is Upgrade Solution. It is significant, that this operation is asynchronous, it takes some time to complete, so we can’t upgrade particular feature while .wsp file, that contains this feature is still updating in central admin. We need to wait, until update solution operation will be completed, then we can call feature upgrade method. More...
Hi all! Based on this sharepoint.stackexchange question.
May be in some reasons you want to disable all drag-and-drop event for your calendar list. I don’t know if it possible through C# code, but it’s possible through javascript. In SP.UI.ApplicationPages.Calendar.js there is a factory method SP.UI.ApplicationPages.CalendarContainerFactory.create.This method creates and initializes instance of calendar using javascript. Among other parameters this function accepts context object that contains initialization info about calendar (cctx object). This object contains property DataSources (Array) and each array element is an object that has property named disableDrag. disableDrag false by default. The main idea is to substitute factory method and pass updated cctx object, that has disableDrag=true for every datasource. Edit page with calendar and add content editor web part. In content past this code:
<script type='text/javascript'>
  ExecuteOrDelayUntilScriptLoaded(function(){
    var calendarCreate = SP.UI.ApplicationPages.CalendarContainerFactory.create;
        SP.UI.ApplicationPages.CalendarContainerFactory.create = function(elem, cctx, viewType, date, startupData) {
            if(cctx.dataSources && cctx.dataSources instanceof Array && cctx.dataSources.length > 0){
                for(var i = 0; i < cctx.dataSources.length; i++){
                    cctx.dataSources[i].disableDrag = true;
                }
            }
            calendarCreate(elem, cctx, viewType, date, startupData);
        }
  }, 'SP.UI.ApplicationPages.Calendar.js');
</script>
or through code (don’t forget about proper disposing):
var site = new SPSite("http://localhost/sites/test/");
var web = site.OpenWeb();
var wpManager = web.GetLimitedWebPartManager("Lists/cal/calendar.aspx", PersonalizationScope.Shared);
var contentEditor = new ContentEditorWebPart();
var xmlDoc = new XmlDocument();
var xmlElement = xmlDoc.CreateElement("HtmlContent");
xmlElement.InnerText = @"<script type='text/javascript'>
      ExecuteOrDelayUntilScriptLoaded(function(){
		var calendarCreate = SP.UI.ApplicationPages.CalendarContainerFactory.create;
        SP.UI.ApplicationPages.CalendarContainerFactory.create = function(elem, cctx, viewType, date, startupData) {
            if(cctx.dataSources && cctx.dataSources instanceof Array && cctx.dataSources.length > 0){
                for(var i = 0; i < cctx.dataSources.length; i++){
                    cctx.dataSources[i].disableDrag = true;
                }
            }
            calendarCreate(elem, cctx, viewType, date, startupData);
        }
  }, 'SP.UI.ApplicationPages.Calendar.js');
    </script>";
contentEditor.Content = xmlElement;
wpManager.AddWebPart(contentEditor, "Main", 0);
And that’s it. This code disables drag and drop for events for month, week, and day view. Hope this helps.
Hi all! May be you are already familiar with sharepoint 2010 script on demand feature. Recently I was playing with it and want to show some examples and explanations how it works.
There is a server control, that is responsible for rendering scripts on demand - ScriptLink .This control has 4 significant properties: LoadAfterUI, Name, OnDemand and Localizable.
- LoadAfterUI (if true) means that your script link (or script) will be rendered at the vary end of the <form> tag (when all other html elements already loaded). if this property equals to false, script will be inserted right after <form> tag. Internally, methods RegisterStartupScript and RegisterClientScriptBlock used. The only difference between these two methods is where each one emits the script block.
RegisterClientScriptBlock() emits the script block at the beginning of the Web Form (right after the <form runat="server"> tag), while RegisterStartupScript() emits the script block at the end of the Web Form (right before the </form> tag).
- Name - name of script file (or path to that file – read below). This property uses by javascript as key that uniquely identify loaded script.
- Localizable – if true, sharepoint try to find your script under “_layouts/1033/”
- OnDemand – the most interesting property, indicates if we need this script load immediately, or if it should be downloaded on demand
Ok, some examples. Imagine we have script file myscript.js directly inside the layouts folder and we want to load it (OnDemand = false) . Its easy:
<SharePoint:ScriptLink runat="server" ID="sl" Localizable="False" LoadAfterUI="False" Name="myscript" OnDemand="False"></SharePoint:ScriptLink>
This action produces this output:
<script src="/_layouts/myscript.js?rev=7KqI9%2FoL9hClomz1RdzTqg%3D%3D" type="text/javascript"></script>
More...
Hi2all! Today I'm going to explain how you can easily extend your deployment tasks using Visual Studio and plugin CKSDEV for Visual Studio 2010. This plugin enhance VS with many custom SharePoint project items (SPI), add additional deployment configuration for your project and some other useful details. One of the most great possibilities that CKSDEV offer are additional deployment steps:
Imagine that after deployment you must create on the site several sharepoint groups and assign permission to them. Using deployment step "Run PowerShell Script" you can place all logic reside to group creation to your custom powershell script file and execute this script file after deployment. We start with creation of script file and then we integrate script in Visual Studio 2010.
I've been created xml file definition for groups that have such structure:
DOMAIN\FirstName_SecondName
Now lets create two files - in the first we are storing all functions and the second will use functions from this file. Call the first file "functions.ps1" and the second - "starter.ps1". "functions.ps1" include function "AddGroups" that actually read xml with group definition and adds required groups to a site. I will explain in other post how my code work, but it rather simple, if you have base knowledges of powershell you easily understand it:
More...